搜索到
4
篇与
的结果
-
 Flowable工作流引擎源码深度解析 Flowable工作流引擎源码深度解析 前言 Flowable是一个轻量级的业务流程引擎,基于BPMN 2.0规范实现,是Activiti项目的一个分支。作为Java生态中最流行的工作流引擎之一,了解其内部实现对于定制化开发和性能优化至关重要。本文将深入分析Flowable的核心源码结构和执行逻辑,帮助开发者更好地理解和使用这一强大工具。 核心架构概览 Flowable的源码主要分为以下几个核心模块: flowable-engine:核心引擎实现 flowable-bpmn-converter:BPMN模型转换器 flowable-process-validation:流程验证模块 flowable-image-generator:流程图生成模块 flowable-rest:REST API实现 其中,flowable-engine是最核心的部分,我们的分析也将主要集中在这个模块上。 ProcessEngine初始化流程 Flowable的入口是ProcessEngine接口,通常通过ProcessEngineConfiguration来创建。让我们看看其初始化过程: public class ProcessEngineConfigurationImpl extends ProcessEngineConfiguration { public ProcessEngine buildProcessEngine() { init(); ProcessEngineImpl processEngine = new ProcessEngineImpl(this); postProcessEngineInitialisation(); return processEngine; } public void init() { initCommandContextFactory(); initTransactionContextFactory(); initCommandExecutors(); initServices(); initDataSource(); initDbSchema(); initBeans(); initTransactionFactory(); // 其他初始化方法... } } 初始化过程主要包括: 初始化命令上下文工厂 初始化事务上下文工厂 初始化命令执行器 初始化各种服务 初始化数据源和数据库架构 初始化事务工厂等 这种设计遵循了良好的工厂模式和构建器模式。 命令模式的应用 Flowable大量使用了命令模式,所有对流程的操作都被封装为Command对象: public interface Command<T> { T execute(CommandContext commandContext); } 执行命令的是CommandExecutor,它主要有两个实现: CommandExecutorImpl:普通实现 TransactionCommandExecutor:带事务的实现 让我们看看CommandExecutorImpl的实现: public class CommandExecutorImpl implements CommandExecutor { protected CommandContextFactory commandContextFactory; protected TransactionContextFactory transactionContextFactory; public <T> T execute(Command<T> command) { CommandContext commandContext = commandContextFactory.createCommandContext(command); try { T result = command.execute(commandContext); commandContext.close(); return result; } catch (Exception e) { commandContext.exception(e); } finally { try { commandContext.close(); } catch (Exception e) { // 日志记录 } } return null; } } 这种设计确保了所有流程操作都在一个一致的上下文中执行,并且可以正确处理事务和异常。 流程定义加载 当我们部署一个BPMN文件时,Flowable会解析它并转换为内部模型。核心类是BpmnParser: public class BpmnParser { public BpmnParse createParse() { return new BpmnParse(this); } public BpmnParse parse(InputStream inputStream) { BpmnParse bpmnParse = createParse(); bpmnParse.sourceInputStream = inputStream; bpmnParse.execute(); return bpmnParse; } } BpmnParse类负责具体的解析逻辑: public class BpmnParse extends BpmnParseHandler { public BpmnParse execute() { try { // 解析XML文档 DocumentBuilderFactory dbf = XmlUtil.createSafeDocumentBuilderFactory(); Document document = dbf.newDocumentBuilder().parse(sourceInputStream); // 解析BPMN元素 parseRootElement(document.getDocumentElement()); // 处理流程定义 processDI(); // 完成解析 executeParse(); } catch (Exception e) { // 异常处理 } return this; } protected void parseRootElement(Element rootElement) { // 解析流程、任务、网关等元素 } } 这个过程将BPMN文件转换为ProcessDefinitionEntity对象,其中包含了流程的所有信息。 流程执行引擎 流程实例的执行由ExecutionEntity类负责: public class ExecutionEntity implements Execution, ExecutionListenerContainer { protected String id; protected ProcessDefinitionEntity processDefinition; protected String businessKey; protected String activityId; protected ExecutionEntity parent; protected List<ExecutionEntity> executions = new ArrayList<>(); // 其他属性... public void start() { CommandContext commandContext = Context.getCommandContext(); // 执行流程实例启动逻辑 // 触发事件监听器 // 执行第一个活动节点 } public void continueExecution() { ExecutionEntity execution = this; while (execution != null && execution.isActive()) { ActivityImpl activity = execution.getActivity(); if (activity != null) { // 执行当前活动节点 execution = activity.execute(execution); } else { // 已完成 execution = null; } } } } 每个流程实例都对应一个ExecutionEntity,每个并行流程也对应一个子ExecutionEntity。 任务管理 任务由TaskEntity类表示: public class TaskEntity implements Task { protected String id; protected String name; protected String description; protected String assignee; protected Date createTime; protected String executionId; protected String processInstanceId; // 其他属性... public void complete() { // 验证任务状态 // 执行任务完成逻辑 // 触发事件监听器 // 推进流程执行 } } 任务的创建、分配和完成都是通过TaskService接口实现的: public interface TaskService { Task newTask(); void saveTask(Task task); void deleteTask(String taskId); void claim(String taskId, String userId); void complete(String taskId); // 其他方法... } 事件监听机制 Flowable提供了丰富的事件监听机制,核心接口是FlowableEventListener: public interface FlowableEventListener { void onEvent(FlowableEvent event); boolean isFailOnException(); } 事件类型由FlowableEventType枚举定义,包括流程启动、任务创建、流程完成等多种类型。 事件的分发由FlowableEventDispatcher接口负责: public interface FlowableEventDispatcher { void addEventListener(FlowableEventListener listener); void addEventListener(FlowableEventListener listener, FlowableEventType... types); void removeEventListener(FlowableEventListener listener); void dispatchEvent(FlowableEvent event); } 这种设计允许我们在流程的各个阶段插入自定义逻辑。 数据持久化 Flowable使用MyBatis作为ORM框架进行数据持久化。核心接口是DbSqlSession: public class DbSqlSession implements Session { protected SqlSession sqlSession; protected DbSqlSessionFactory dbSqlSessionFactory; protected List<PersistentObject> insertedObjects = new ArrayList<>(); protected List<PersistentObject> updatedObjects = new ArrayList<>(); protected List<PersistentObject> deletedObjects = new ArrayList<>(); public void flush() { // 处理插入对象 for (PersistentObject insertedObject : insertedObjects) { String insertStatement = dbSqlSessionFactory.getInsertStatement(insertedObject); sqlSession.insert(insertStatement, insertedObject); } // 处理更新对象 for (PersistentObject updatedObject : updatedObjects) { String updateStatement = dbSqlSessionFactory.getUpdateStatement(updatedObject); sqlSession.update(updateStatement, updatedObject); } // 处理删除对象 for (PersistentObject deletedObject : deletedObjects) { String deleteStatement = dbSqlSessionFactory.getDeleteStatement(deletedObject); sqlSession.delete(deleteStatement, deletedObject); } // 清空缓存 insertedObjects.clear(); updatedObjects.clear(); deletedObjects.clear(); } } 所有实体对象的变更都会被记录在这些列表中,然后在事务提交时一次性写入数据库。 性能优化 Flowable做了许多性能优化,其中最重要的是缓存机制: public class DeploymentCache<T> { protected Map<String, T> cache = new HashMap<>(); protected int limit; protected LinkedList<String> keyList = new LinkedList<>(); public void add(String id, T obj) { if (limit > 0 && keyList.size() >= limit) { String oldestKey = keyList.removeFirst(); cache.remove(oldestKey); } cache.put(id, obj); keyList.addLast(id); } public T get(String id) { return cache.get(id); } public void remove(String id) { cache.remove(id); keyList.remove(id); } } 这种LRU缓存确保了频繁使用的流程定义可以快速获取,而不需要重复从数据库加载。 扩展点分析 Flowable提供了丰富的扩展点,允许开发者定制化流程行为: TaskListener:任务生命周期监听器 ExecutionListener:执行流程监听器 ActivityBehavior:自定义活动行为 ExpressionManager:表达式管理器 VariableType:自定义变量类型 以TaskListener为例: public interface TaskListener { String EVENTNAME_CREATE = "create"; String EVENTNAME_ASSIGNMENT = "assignment"; String EVENTNAME_COMPLETE = "complete"; String EVENTNAME_DELETE = "delete"; void notify(DelegateTask delegateTask); } 通过实现这个接口,我们可以在任务的各个生命周期阶段插入自定义逻辑。 异步执行器 Flowable 6引入了新的异步执行器,替代了旧的JobExecutor: public class DefaultAsyncExecutor implements AsyncExecutor { protected ThreadPoolExecutor threadPoolExecutor; protected RejectedExecutionHandler rejectedExecutionHandler; protected ThreadFactory threadFactory; public void start() { if (threadPoolExecutor == null) { threadPoolExecutor = new ThreadPoolExecutor( corePoolSize, maxPoolSize, keepAliveTime, TimeUnit.MILLISECONDS, new ArrayBlockingQueue<>(queueSize), threadFactory, rejectedExecutionHandler ); } // 启动作业获取线程 startJobAcquisitionThread(); } protected void executeAsyncJob(Job job) { Runnable runnable = new ExecuteAsyncRunnable(job, this); threadPoolExecutor.execute(runnable); } } 这种设计使得Flowable可以高效地处理大量的异步任务。 我很乐意解释Flowable 6.x中如何实现动态加节点,并提供一个实用的demo。 在Flowable 6.x中,动态修改流程实例主要通过RuntimeService的API来实现,特别是通过createProcessInstanceModification方法。下面我将详细介绍实现方法并提供一个完整的示例。 package com.example.flowable; import org.flowable.engine.*; import org.flowable.engine.impl.cfg.StandaloneProcessEngineConfiguration; import org.flowable.engine.repository.Deployment; import org.flowable.engine.repository.ProcessDefinition; import org.flowable.engine.runtime.ProcessInstance; import org.flowable.task.api.Task; import java.util.HashMap; import java.util.List; import java.util.Map; /** * Flowable 6.x 动态添加节点示例 */ public class FlowableDynamicTaskDemo { public static void main(String[] args) { // 初始化流程引擎 ProcessEngine processEngine = initProcessEngine(); // 获取各种服务 RepositoryService repositoryService = processEngine.getRepositoryService(); RuntimeService runtimeService = processEngine.getRuntimeService(); TaskService taskService = processEngine.getTaskService(); // 部署流程定义 Deployment deployment = repositoryService.createDeployment() .addClasspathResource("dynamic-process.bpmn20.xml") .deploy(); ProcessDefinition processDefinition = repositoryService.createProcessDefinitionQuery() .deploymentId(deployment.getId()) .singleResult(); System.out.println("流程定义部署完成: " + processDefinition.getName()); // 启动流程实例 Map<String, Object> variables = new HashMap<>(); variables.put("applicant", "张三"); variables.put("amount", 5000); ProcessInstance processInstance = runtimeService.startProcessInstanceByKey("dynamicProcess", variables); System.out.println("流程实例启动成功,ID: " + processInstance.getId()); // 查询当前任务 Task currentTask = taskService.createTaskQuery() .processInstanceId(processInstance.getId()) .singleResult(); System.out.println("当前任务: " + currentTask.getName()); // 动态添加一个审核任务节点 System.out.println("开始动态添加节点..."); dynamicallyAddTask(runtimeService, processInstance.getId(), currentTask.getId()); // 完成当前任务 taskService.complete(currentTask.getId()); System.out.println("完成任务: " + currentTask.getName()); // 查看动态添加的任务 List<Task> tasks = taskService.createTaskQuery() .processInstanceId(processInstance.getId()) .list(); for (Task task : tasks) { System.out.println("当前活动任务: " + task.getName() + ", ID: " + task.getId()); // 完成动态添加的任务 taskService.complete(task.getId()); System.out.println("完成任务: " + task.getName()); } // 检查流程是否结束 ProcessInstance runningInstance = runtimeService.createProcessInstanceQuery() .processInstanceId(processInstance.getId()) .singleResult(); if (runningInstance == null) { System.out.println("流程实例已完成"); } else { System.out.println("流程实例仍在运行"); } } /** * 动态添加任务节点 */ private static void dynamicallyAddTask(RuntimeService runtimeService, String processInstanceId, String activityId) { runtimeService.createProcessInstanceModification(processInstanceId) .startBeforeActivity(activityId) // 在当前活动前启动 .addExecution() // 添加一个执行分支 .callActivity("dynamicTask") // 调用一个动态任务活动 .setVariable("reviewer", "李四") // 设置变量 .setVariable("dynamicTaskName", "财务经理审核") // 动态任务名称 .execute(); System.out.println("动态任务添加成功"); } /** * 初始化流程引擎 */ private static ProcessEngine initProcessEngine() { ProcessEngineConfiguration cfg = new StandaloneProcessEngineConfiguration() .setJdbcUrl("jdbc:h2:mem:flowable;DB_CLOSE_DELAY=-1") .setJdbcUsername("sa") .setJdbcPassword("") .setJdbcDriver("org.h2.Driver") .setDatabaseSchemaUpdate(ProcessEngineConfiguration.DB_SCHEMA_UPDATE_TRUE); return cfg.buildProcessEngine(); } } <?xml version="1.0" encoding="UTF-8"?> <definitions xmlns="http://www.omg.org/spec/BPMN/20100524/MODEL" xmlns:xsi="http://www.w3.org/2001/XMLSchema-instance" xmlns:flowable="http://flowable.org/bpmn" targetNamespace="http://www.flowable.org/processdef"> <process id="dynamicProcess" name="动态节点示例流程" isExecutable="true"> <startEvent id="startEvent" name="开始"/> <sequenceFlow id="flow1" sourceRef="startEvent" targetRef="firstTask"/> <userTask id="firstTask" name="部门经理审批" flowable:assignee="${applicant}"> <documentation>申请金额: ${amount}</documentation> </userTask> <sequenceFlow id="flow2" sourceRef="firstTask" targetRef="dynamicTask"/> <userTask id="dynamicTask" name="动态任务" flowable:assignee="${reviewer}"> <documentation>这是一个可以被动态添加的任务节点</documentation> </userTask> <sequenceFlow id="flow3" sourceRef="dynamicTask" targetRef="endEvent"/> <endEvent id="endEvent" name="结束"/> </process> </definitions> 在Flowable 6.x中动态添加节点主要有以下几种方法: 主要方法 流程实例修改 - 通过RuntimeService提供的API: runtimeService.createProcessInstanceModification(processInstanceId) .startBeforeActivity("activityId") // 在指定活动前启动 .execute(); 动态子流程注入 - 在运行时动态添加子流程: runtimeService.createProcessInstanceModification(processInstanceId) .addExecution() .callActivity("subProcessId") .execute(); 动态创建活动 - 直接创建和执行新活动: runtimeService.createProcessInstanceModification(processInstanceId) .startBeforeActivity("userTaskId") .setVariable("assignee", "动态分配的用户") .execute(); 使用场景 动态添加节点在以下场景特别有用: 基于业务规则动态调整审批流程 根据申请金额/内容添加额外的审核步骤 特殊情况下插入临时审核/处理节点 灵活处理流程异常情况 实现要点 确保节点ID唯一性:动态添加的节点必须有唯一的ID 维护执行链的完整性:确保流程能正确流转 变量传递:为动态节点设置必要的流程变量 权限管理:动态添加的任务需要正确分配处理人 注意事项 过度使用动态节点会使流程追踪和维护变得困难 动态节点可能不会显示在流程图上,需要额外的审计记录 升级到Flowable 7时,部分API可能会有变化 确保动态添加的节点在流程异常时能够被正确处理 这个示例展示了如何在Flowable 6.x版本中动态添加一个审核任务节点。你可以根据实际需求调整代码,例如添加多个节点、条件节点或并行节点。 结论 通过深入分析Flowable的源码,我们可以看到它采用了许多优秀的设计模式: 命令模式:封装所有流程操作 工厂模式:创建各种对象 构建器模式:配置引擎 策略模式:不同的活动行为 观察者模式:事件监听机制 这些设计使得Flowable既灵活又强大,能够适应各种复杂的业务流程需求。同时,它的性能优化策略也确保了在高负载环境下的稳定运行。 对于想要深入了解工作流引擎实现的开发者,Flowable的源码提供了一个很好的学习案例。通过理解其内部机制,我们可以更好地使用和扩展这个强大的引擎。 参考资源 Flowable GitHub仓库:https://github.com/flowable/flowable-engine Flowable官方文档:https://www.flowable.org/docs/userguide/index.html BPMN 2.0规范:https://www.omg.org/spec/BPMN/2.0/
 -
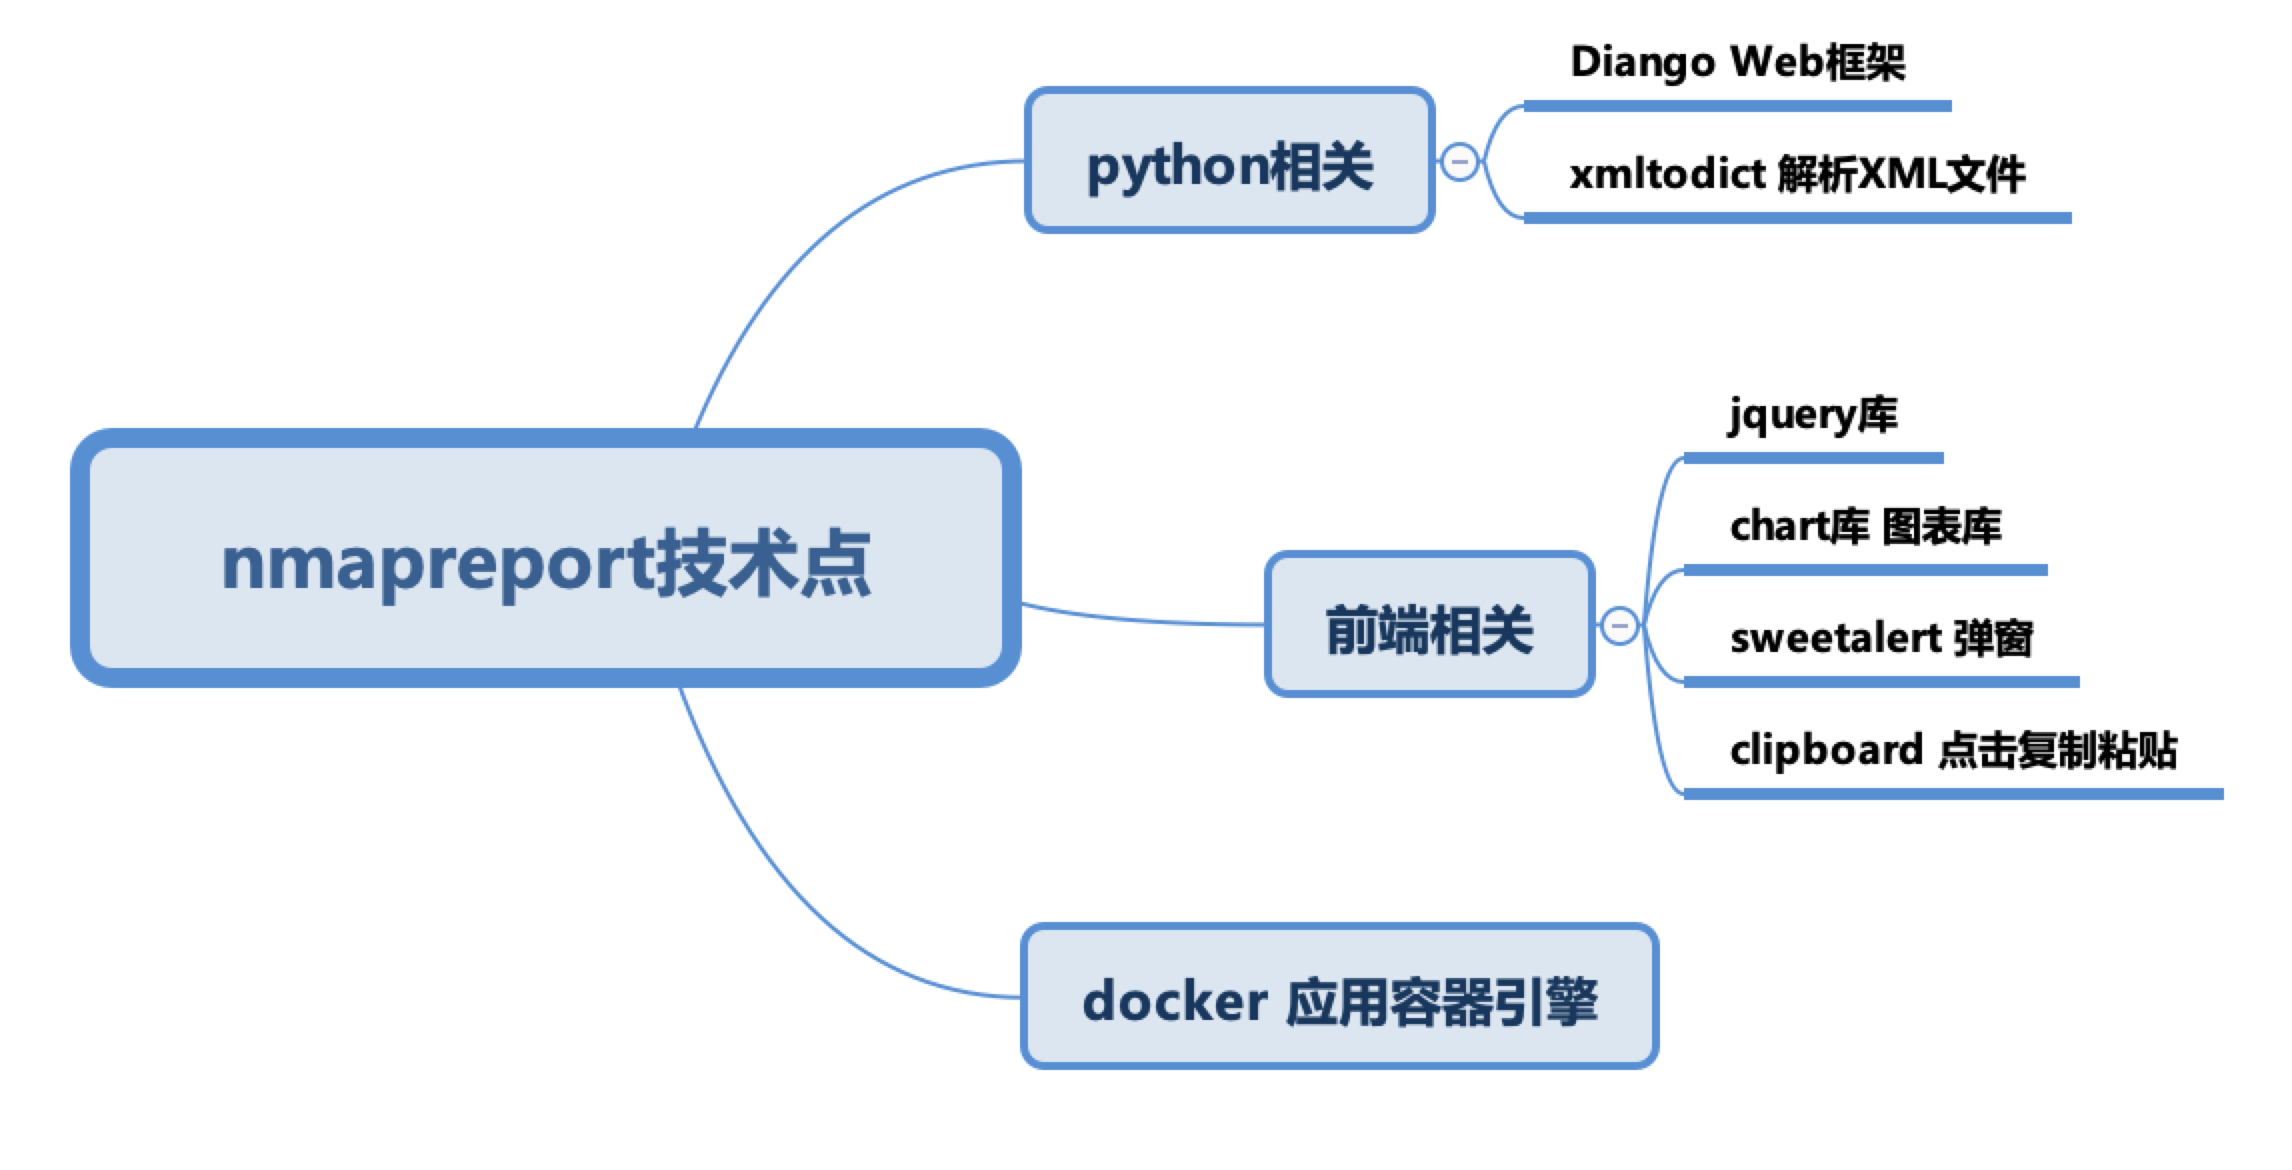
帮朋友撸的一个居于nmap和cve扫描服务漏洞的程序 帮朋友撸的一个居于nmap和cve扫描服务漏洞的程序 现在开源 源码地址:https://github.com/javajeans/nmapreport A Web Dashbord for Nmap And Cve XML Report 使用说明 目录结构 |——————docker docker配置相关 | |———settings.py diango、python的基础系统环境配置 | |———urls.py URL分发器(路由配置文件) |——————nmap | |———nse 暂时不需要 | |———cron.py 任务调度规则 |——————static 本地文件,其中包括css文件夹存放css文件 | |———async.js js脚本 |——————templates html模板文件 |——————nmapreport | |———main.html 页面主体 | |———nmap_auth.html 授权模板(暂时不用) | |———nmap_hostdetails.html network模板 | |———nmap_ndiff.html nmap cve比对(是否重新扫描) | |———nmap_network.html 网络视图模块 | |———nmap_portdetails.html 报告详情 | |———nmap_xmlfiles.html 主页显示内容 | |———report.html 报告 |——————api.py #请求接口方法实现 |——————apps.py 启动入口 |——————functions.py 常规函数 |——————functions_nmap.py nmap相关函数 |——————ndiff.py nmap,cve比对 |——————network.py 网络视图相关逻辑 |——————pdf.py pdf生成逻辑 |——————token.py token生成逻辑 |——————urls.py 路由 |——————views.py 视图跳转逻辑 需要的环境 docker(https://docs.docker.com/) Virtualbox[https://www.virtualbox.org/wiki/Downloads] (演示使用) 技术说明 演示环境说明 如何本地搭建环境测试 搭建两台虚拟机 一台作为扫描、一台被扫描(或者多台,可安装windows、mac等)建议使用virtualbox 系统使用 1.点击"进入系统" 2.创建Nmap扫描 3.扫码列表 4.扫码详情 5.cve检查漏洞 如何使用 docker run -d -v /opt/nmapreport/docker/xml:/opt/xml -p 8081:8000 1249913118/nmapreport 代码位置:/opt/nmapdashboard/nmapreport,可以将此文件映射出来,直接修改 注意:代码修改可执行docker build -t nmapreport:latest .如果不想使用docker可以直接部署在linux环境内(mac、centos、ubuntu) 部署可参考docker的dockerfile文件步骤
-
Spring Security OAuth2 源码阅读笔记 Spring Security OAuth2 源码阅读笔记 一、架构概述 Spring Security OAuth2 是基于Spring Security构建的OAuth2实现,提供了完整的授权服务器、资源服务器和客户端支持。通过阅读源码,我们可以深入理解OAuth2的工作原理和Spring的实现方式。 1.1 主要模块 Authorization Server: 授权服务器,负责颁发令牌 Resource Server: 资源服务器,负责保护资源 Client: OAuth2客户端,用于请求访问受保护的资源 1.2 核心接口 TokenStore: 令牌存储 ClientDetailsService: 客户端详情服务 UserDetailsService: 用户详情服务 TokenGranter: 令牌授予器 OAuth2RequestFactory: OAuth2请求工厂 二、授权服务器源码分析 2.1 AuthorizationServerSecurityConfigurer public final class AuthorizationServerSecurityConfigurer extends SecurityConfigurerAdapter<DefaultSecurityFilterChain, HttpSecurity> { private AuthenticationManager authenticationManager; private AuthenticationEntryPoint authenticationEntryPoint; private PasswordEncoder passwordEncoder; private String realm = "oauth2/client"; private boolean allowFormAuthenticationForClients = false; private String tokenKeyAccess = "denyAll()"; private String checkTokenAccess = "denyAll()"; // ... @Override public void configure(HttpSecurity http) throws Exception { // 配置/oauth/token_key和/oauth/check_token端点的安全性 ClientDetailsService clientDetailsService = clientDetailsServiceBuilder.build(); clientDetailsService = new ClientDetailsUserDetailsService(clientDetailsService); // ... // 设置OAuth2的客户端认证过滤器 http.addFilterBefore(new ClientCredentialsTokenEndpointFilter(http.getSharedObject(AuthenticationManager.class)), BasicAuthenticationFilter.class); // ... } // ... } AuthorizationServerSecurityConfigurer配置授权服务器的安全性,包括客户端身份验证、端点访问控制等。 2.2 AuthorizationServerEndpointsConfigurer public final class AuthorizationServerEndpointsConfigurer { private AuthenticationManager authenticationManager; private List<AuthorizationServerConfigurer> configurers = Collections.emptyList(); private TokenStore tokenStore; private TokenGranter tokenGranter; private ConsumerTokenServices consumerTokenServices; private AuthorizationCodeServices authorizationCodeServices; private UserDetailsService userDetailsService; private OAuth2RequestFactory requestFactory; // ... public TokenGranter getTokenGranter() { if (tokenGranter == null) { tokenGranter = new CompositeTokenGranter(getDefaultTokenGranters()); } return tokenGranter; } private List<TokenGranter> getDefaultTokenGranters() { ClientDetailsService clientDetails = clientDetailsService(); AuthorizationServerTokenServices tokenServices = tokenServices(); List<TokenGranter> tokenGranters = new ArrayList<TokenGranter>(); tokenGranters.add(new AuthorizationCodeTokenGranter(tokenServices, authorizationCodeServices, clientDetails, this.requestFactory)); tokenGranters.add(new RefreshTokenGranter(tokenServices, clientDetails, this.requestFactory)); tokenGranters.add(new ImplicitTokenGranter(tokenServices, clientDetails, this.requestFactory)); tokenGranters.add(new ClientCredentialsTokenGranter(tokenServices, clientDetails, this.requestFactory)); if (authenticationManager != null) { tokenGranters.add(new ResourceOwnerPasswordTokenGranter(authenticationManager, tokenServices, clientDetails, this.requestFactory)); } return tokenGranters; } // ... } AuthorizationServerEndpointsConfigurer配置授权服务器的端点,包括令牌授予器、令牌服务等。 2.3 TokenEndpoint @FrameworkEndpoint public class TokenEndpoint extends AbstractEndpoint { @RequestMapping(value = "/oauth/token", method=RequestMethod.POST) public ResponseEntity<OAuth2AccessToken> postAccessToken(Principal principal, @RequestParam Map<String, String> parameters) throws HttpRequestMethodNotSupportedException { if (!(principal instanceof Authentication)) { throw new InsufficientAuthenticationException( "There is no client authentication. Try adding an appropriate authentication filter."); } String clientId = getClientId(principal); ClientDetails authenticatedClient = getClientDetailsService().loadClientByClientId(clientId); TokenRequest tokenRequest = getOAuth2RequestFactory().createTokenRequest(parameters, authenticatedClient); // ... OAuth2AccessToken token = getTokenGranter().grant(tokenRequest.getGrantType(), tokenRequest); if (token == null) { throw new UnsupportedGrantTypeException("Unsupported grant type: " + tokenRequest.getGrantType()); } return getResponse(token); } // ... } TokenEndpoint是OAuth2 /oauth/token端点的实现,负责处理令牌请求。 2.4 CompositeTokenGranter public class CompositeTokenGranter implements TokenGranter { private final List<TokenGranter> tokenGranters; public CompositeTokenGranter(List<TokenGranter> tokenGranters) { this.tokenGranters = new ArrayList<TokenGranter>(tokenGranters); } public OAuth2AccessToken grant(String grantType, TokenRequest tokenRequest) { for (TokenGranter granter : tokenGranters) { OAuth2AccessToken grant = granter.grant(grantType, tokenRequest); if (grant != null) { return grant; } } return null; } // ... } CompositeTokenGranter是一个组合模式的实现,它包含多个TokenGranter,用于支持不同的授权类型。 2.5 DefaultTokenServices public class DefaultTokenServices implements AuthorizationServerTokenServices, ResourceServerTokenServices, ConsumerTokenServices { private TokenStore tokenStore; private ClientDetailsService clientDetailsService; private TokenEnhancer accessTokenEnhancer; private AuthenticationManager authenticationManager; private boolean supportRefreshToken = false; private boolean reuseRefreshToken = true; private int refreshTokenValiditySeconds = 60 * 60 * 24 * 30; // default 30 days. private int accessTokenValiditySeconds = 60 * 60 * 12; // default 12 hours. @Override public OAuth2AccessToken createAccessToken(OAuth2Authentication authentication) throws AuthenticationException { OAuth2AccessToken existingAccessToken = tokenStore.getAccessToken(authentication); OAuth2RefreshToken refreshToken = null; if (existingAccessToken != null) { if (existingAccessToken.isExpired()) { if (existingAccessToken.getRefreshToken() != null) { refreshToken = existingAccessToken.getRefreshToken(); // The token store could remove the refresh token when the // access token is removed, but we want to // be sure... tokenStore.removeRefreshToken(refreshToken); } tokenStore.removeAccessToken(existingAccessToken); } else { // Re-store the access token in case the authentication has changed tokenStore.storeAccessToken(existingAccessToken, authentication); return existingAccessToken; } } // 创建刷新令牌 if (refreshToken == null) { refreshToken = createRefreshToken(authentication); } // But the refresh token itself might need to be re-issued if it has // expired. else if (refreshToken instanceof ExpiringOAuth2RefreshToken) { ExpiringOAuth2RefreshToken expiring = (ExpiringOAuth2RefreshToken) refreshToken; if (System.currentTimeMillis() > expiring.getExpiration().getTime()) { refreshToken = createRefreshToken(authentication); } } // 创建访问令牌 OAuth2AccessToken accessToken = createAccessToken(authentication, refreshToken); tokenStore.storeAccessToken(accessToken, authentication); refreshToken = accessToken.getRefreshToken(); if (refreshToken != null) { tokenStore.storeRefreshToken(refreshToken, authentication); } return accessToken; } // ... } DefaultTokenServices是令牌服务的默认实现,负责创建、刷新和存储令牌。 三、资源服务器源码分析 3.1 ResourceServerSecurityConfigurer public final class ResourceServerSecurityConfigurer extends SecurityConfigurerAdapter<DefaultSecurityFilterChain, HttpSecurity> { private AuthenticationManager authenticationManager; private ResourceServerTokenServices resourceTokenServices; private TokenStore tokenStore; private String resourceId = "oauth2-resource"; private AuthenticationEntryPoint authenticationEntryPoint = new OAuth2AuthenticationEntryPoint(); @Override public void configure(HttpSecurity http) throws Exception { // 配置OAuth2AuthenticationProcessingFilter // ... } // ... } ResourceServerSecurityConfigurer配置资源服务器的安全性,包括令牌服务、资源ID等。 3.2 OAuth2AuthenticationProcessingFilter public class OAuth2AuthenticationProcessingFilter extends AbstractAuthenticationProcessingFilter { private AuthenticationManager authenticationManager; private AuthenticationEntryPoint authenticationEntryPoint; private TokenExtractor tokenExtractor = new BearerTokenExtractor(); private OAuth2AuthenticationDetails.TokenExtractor tokenDetailsExtractor = new OAuth2AuthenticationDetails.TokenExtractor(); private AuthenticationDetailsSource<HttpServletRequest, ?> authenticationDetailsSource = new OAuth2AuthenticationDetailsSource(); @Override public Authentication attemptAuthentication(HttpServletRequest request, HttpServletResponse response) throws AuthenticationException, IOException, ServletException { OAuth2Authentication authentication = loadAuthentication(request); if (authentication == null) { throw new BadCredentialsException("Invalid token"); } return authentication; } protected OAuth2Authentication loadAuthentication(HttpServletRequest request) { final OAuth2AccessToken token = tokenExtractor.extract(request); if (token == null) { throw new InvalidTokenException("Token not found"); } OAuth2Authentication auth = tokenServices.loadAuthentication(token.getValue()); if (auth == null) { throw new InvalidTokenException("Invalid token: " + token.getValue()); } return auth; } // ... } OAuth2AuthenticationProcessingFilter负责从请求中提取令牌并验证其有效性。 3.3 BearerTokenExtractor public class BearerTokenExtractor implements TokenExtractor { private static final Pattern AUTHORIZATION_PATTERN = Pattern.compile("^Bearer (?<token>[a-zA-Z0-9-._~+/]+=*)$", Pattern.CASE_INSENSITIVE); @Override public OAuth2AccessToken extract(HttpServletRequest request) { String tokenValue = extractToken(request); if (tokenValue != null) { return new OAuth2AccessToken(tokenValue); } return null; } protected String extractToken(HttpServletRequest request) { // 从Authorization头部中提取Bearer令牌 String header = request.getHeader("Authorization"); if (header != null) { Matcher matcher = AUTHORIZATION_PATTERN.matcher(header); if (matcher.matches()) { return matcher.group("token"); } } // 从请求参数中提取令牌 String param = request.getParameter("access_token"); if (param != null) { return param; } return null; } // ... } BearerTokenExtractor从请求中提取Bearer令牌。 四、OAuth2客户端源码分析 4.1 OAuth2ClientContextFilter public class OAuth2ClientContextFilter extends OncePerRequestFilter { private OAuth2ClientContext clientContext; @Override protected void doFilterInternal(HttpServletRequest request, HttpServletResponse response, FilterChain filterChain) throws ServletException, IOException { HttpServletRequest servletRequest = (HttpServletRequest) request; HttpServletResponse servletResponse = (HttpServletResponse) response; // 存储当前请求和响应,以便后续使用 request.setAttribute(OAuth2AuthenticationDetails.ACCESS_TOKEN_VALUE, null); try { // 清除现有上下文 OAuth2ClientContext context = new DefaultOAuth2ClientContext(clientContext); OAuth2ClientContextHolder.setContext(context); // 执行过滤器链 filterChain.doFilter(servletRequest, servletResponse); } catch (OAuth2Exception e) { // 处理OAuth2异常 if (e instanceof UserRedirectRequiredException) { UserRedirectRequiredException redirect = (UserRedirectRequiredException) e; String redirectUri = redirect.getRedirectUri(); // 保存当前请求信息,用于重定向后恢复 // 重定向到授权服务器 // ... } else { throw e; } } finally { // 清除上下文 OAuth2ClientContextHolder.clearContext(); } } // ... } OAuth2ClientContextFilter管理OAuth2客户端上下文,处理重定向等操作。 4.2 OAuth2RestTemplate public class OAuth2RestTemplate extends RestTemplate { private final OAuth2ClientContext context; private final AccessTokenProvider accessTokenProvider; private final OAuth2ProtectedResourceDetails resource; @Override protected ClientHttpRequest createRequest(URI uri, HttpMethod method) throws IOException { OAuth2AccessToken accessToken = getAccessToken(); ClientHttpRequest request = super.createRequest(uri, method); request.getHeaders().set("Authorization", "Bearer " + accessToken.getValue()); return request; } protected OAuth2AccessToken getAccessToken() throws UserRedirectRequiredException { OAuth2AccessToken accessToken = context.getAccessToken(); if (accessToken == null || accessToken.isExpired()) { try { accessToken = acquireAccessToken(context); } catch (UserRedirectRequiredException e) { context.setAccessToken(null); throw e; } } return accessToken; } protected OAuth2AccessToken acquireAccessToken(OAuth2ClientContext oauth2Context) throws UserRedirectRequiredException { AccessTokenRequest accessTokenRequest = oauth2Context.getAccessTokenRequest(); // 通过AccessTokenProvider获取令牌 OAuth2AccessToken accessToken = accessTokenProvider.obtainAccessToken(resource, accessTokenRequest); oauth2Context.setAccessToken(accessToken); return accessToken; } // ... } OAuth2RestTemplate是RestTemplate的扩展,自动处理OAuth2令牌的获取和使用。 五、令牌存储实现分析 5.1 InMemoryTokenStore public class InMemoryTokenStore implements TokenStore { private final ConcurrentHashMap<String, OAuth2AccessToken> accessTokenStore = new ConcurrentHashMap<String, OAuth2AccessToken>(); private final ConcurrentHashMap<String, OAuth2Authentication> authenticationStore = new ConcurrentHashMap<String, OAuth2Authentication>(); private final ConcurrentHashMap<String, OAuth2RefreshToken> refreshTokenStore = new ConcurrentHashMap<String, OAuth2RefreshToken>(); private final ConcurrentHashMap<String, String> accessTokenToRefreshToken = new ConcurrentHashMap<String, String>(); private final ConcurrentHashMap<String, String> refreshTokenToAccessToken = new ConcurrentHashMap<String, String>(); private final ConcurrentHashMap<String, Collection<OAuth2AccessToken>> authenticationToAccessTokenStore = new ConcurrentHashMap<String, Collection<OAuth2AccessToken>>(); private final ConcurrentHashMap<String, Collection<OAuth2AccessToken>> clientIdToAccessTokenStore = new ConcurrentHashMap<String, Collection<OAuth2AccessToken>>(); private final ConcurrentHashMap<String, Collection<OAuth2AccessToken>> userNameToAccessTokenStore = new ConcurrentHashMap<String, Collection<OAuth2AccessToken>>(); @Override public OAuth2AccessToken getAccessToken(OAuth2Authentication authentication) { // 根据认证信息查找访问令牌 // ... } @Override public void storeAccessToken(OAuth2AccessToken token, OAuth2Authentication authentication) { // 存储访问令牌 String refreshToken = null; if (token.getRefreshToken() != null) { refreshToken = token.getRefreshToken().getValue(); } if (refreshToken != null) { // 关联访问令牌和刷新令牌 accessTokenToRefreshToken.put(token.getValue(), refreshToken); refreshTokenToAccessToken.put(refreshToken, token.getValue()); } // 存储令牌和认证信息 accessTokenStore.put(token.getValue(), token); authenticationStore.put(token.getValue(), authentication); // 添加到认证信息、客户端ID和用户名到访问令牌的映射 // ... } @Override public void removeAccessToken(OAuth2AccessToken token) { // 删除访问令牌 // ... } // 其他方法省略 // ... } InMemoryTokenStore是使用内存存储令牌的实现,适用于单实例应用。 5.2 JdbcTokenStore public class JdbcTokenStore implements TokenStore { private final JdbcTemplate jdbcTemplate; private static final String DEFAULT_ACCESS_TOKEN_INSERT_STATEMENT = "insert into oauth_access_token (token_id, token, authentication_id, user_name, client_id, authentication, refresh_token) values (?, ?, ?, ?, ?, ?, ?)"; private static final String DEFAULT_ACCESS_TOKEN_SELECT_STATEMENT = "select token_id, token from oauth_access_token where token_id = ?"; // 其他SQL语句 // ... @Override public void storeAccessToken(OAuth2AccessToken token, OAuth2Authentication authentication) { String refreshToken = null; if (token.getRefreshToken() != null) { refreshToken = token.getRefreshToken().getValue(); } // 使用JDBC存储访问令牌 jdbcTemplate.update(insertAccessTokenSql, new Object[] { extractTokenKey(token.getValue()), serializeAccessToken(token), authenticationKeyGenerator.extractKey(authentication), authentication.isClientOnly() ? null : authentication.getName(), authentication.getOAuth2Request().getClientId(), serializeAuthentication(authentication), extractTokenKey(refreshToken) }); } @Override public OAuth2AccessToken readAccessToken(String tokenValue) { OAuth2AccessToken accessToken = null; try { accessToken = jdbcTemplate.queryForObject(selectAccessTokenSql, new RowMapper<OAuth2AccessToken>() { public OAuth2AccessToken mapRow(ResultSet rs, int rowNum) throws SQLException { return deserializeAccessToken(rs.getBytes(2)); } }, extractTokenKey(tokenValue)); } catch (EmptyResultDataAccessException e) { // 令牌不存在 } return accessToken; } // 其他方法省略 // ... } JdbcTokenStore使用关系型数据库存储令牌,适用于集群环境。 六、授权类型实现分析 6.1 AuthorizationCodeTokenGranter public class AuthorizationCodeTokenGranter extends AbstractTokenGranter { private final AuthorizationCodeServices authorizationCodeServices; @Override protected OAuth2AccessToken getAccessToken(ClientDetails client, TokenRequest tokenRequest) { Map<String, String> parameters = tokenRequest.getRequestParameters(); String authorizationCode = parameters.get("code"); String redirectUri = parameters.get("redirect_uri"); // 校验授权码 if (authorizationCode == null) { throw new InvalidRequestException("An authorization code must be supplied."); } // 消费授权码,同时获取认证信息 OAuth2Authentication storedAuth = authorizationCodeServices.consumeAuthorizationCode(authorizationCode); if (storedAuth == null) { throw new InvalidGrantException("Invalid authorization code: " + authorizationCode); } // 校验重定向URI OAuth2Request pendingOAuth2Request = storedAuth.getOAuth2Request(); String pendingClientId = pendingOAuth2Request.getClientId(); String clientId = tokenRequest.getClientId(); if (clientId != null && !clientId.equals(pendingClientId)) { throw new InvalidGrantException("Client ID mismatch"); } String pendingRedirectUri = pendingOAuth2Request.getRedirectUri(); if (pendingRedirectUri != null && redirectUri != null && !pendingRedirectUri.equals(redirectUri)) { throw new RedirectMismatchException("Redirect URI mismatch."); } // 创建新的OAuth2Request,继承原有的OAuth2Request中的参数 OAuth2Request oauth2Request = pendingOAuth2Request.createOAuth2Request(client); // 创建OAuth2Authentication OAuth2Authentication authentication = new OAuth2Authentication(oauth2Request, storedAuth.getUserAuthentication()); // 创建访问令牌 OAuth2AccessToken accessToken = getTokenServices().createAccessToken(authentication); return accessToken; } // ... } AuthorizationCodeTokenGranter实现了授权码授权类型。 6.2 RefreshTokenGranter public class RefreshTokenGranter extends AbstractTokenGranter { @Override protected OAuth2AccessToken getAccessToken(ClientDetails client, TokenRequest tokenRequest) { String refreshTokenValue = tokenRequest.getRequestParameters().get("refresh_token"); if (refreshTokenValue == null) { throw new InvalidRequestException("Missing refresh token"); } // 加载刷新令牌 OAuth2RefreshToken refreshToken = tokenServices.getRefreshToken(refreshTokenValue); if (refreshToken == null) { throw new InvalidGrantException("Invalid refresh token: " + refreshTokenValue); } // 校验刷新令牌是否过期 if (refreshToken instanceof ExpiringOAuth2RefreshToken) { ExpiringOAuth2RefreshToken expiringToken = (ExpiringOAuth2RefreshToken) refreshToken; if (expiringToken.getExpiration() != null && expiringToken.getExpiration().before(new Date())) { tokenServices.removeRefreshToken(refreshToken); throw new InvalidTokenException("Invalid refresh token (expired): " + refreshTokenValue); } } // 获取认证信息 OAuth2Authentication authentication = tokenServices.loadAuthentication(refreshTokenValue); // 校验客户端ID String clientId = authentication.getOAuth2Request().getClientId(); if (clientId != null && !clientId.equals(tokenRequest.getClientId())) { throw new InvalidGrantException("Wrong client for this refresh token: " + refreshTokenValue); } // 创建新的访问令牌 return tokenServices.refreshAccessToken(refreshTokenValue, tokenRequest); } // ... } RefreshTokenGranter实现了刷新令牌授权类型。 七、OAuth2异常处理 7.1 OAuth2Exception public class OAuth2Exception extends RuntimeException { private String summary; private String oAuth2ErrorCode; private int httpStatusCode; // 构造方法和getter/setter方法 // ... } OAuth2Exception是OAuth2错误的基类。 7.2 OAuth2ExceptionRenderer public class DefaultOAuth2ExceptionRenderer implements OAuth2ExceptionRenderer { private List<HttpMessageConverter<?>> messageConverters = new ArrayList<HttpMessageConverter<?>>(); @Override public void handleHttpEntityResponse(HttpEntity<?> responseEntity, ServletWebRequest webRequest) throws Exception { if (responseEntity == null) { return; } HttpInputMessage inputMessage = createHttpInputMessage(webRequest); HttpOutputMessage outputMessage = createHttpOutputMessage(webRequest); // 查找适合的消息转换器 Class<?> clazz = responseEntity.getBody().getClass(); List<MediaType> acceptedMediaTypes = webRequest.getRequest().getHeaders("Accept"); MediaType.sortByQualityValue(acceptedMediaTypes); // 使用消息转换器将响应实体输出到响应流中 for (MediaType acceptedMediaType : acceptedMediaTypes) { for (HttpMessageConverter messageConverter : messageConverters) { if (messageConverter.canWrite(clazz, acceptedMediaType)) { messageConverter.write(responseEntity.getBody(), acceptedMediaType, outputMessage); return; } } } // 如果没有找到适合的消息转换器,使用默认的JSON转换器 // ... } // ... } OAuth2ExceptionRenderer负责将OAuth2异常渲染成HTTP响应。 八、总结与心得 通过对Spring Security OAuth2源码的阅读和分析,我对OAuth2的实现机制有了更深入的理解: Spring Security OAuth2通过各种组件(授权服务器、资源服务器、客户端)协同工作,实现完整的OAuth2流程。 令牌的生成、存储和验证是OAuth2的核心功能,Spring Security OAuth2提供了多种令牌存储实现(内存、数据库等)。 授权服务器支持多种授权类型(授权码、隐式授权、密码、客户端凭证、刷新令牌),每种授权类型都有独立的实现类。 Spring Security OAuth2使用过滤器链来处理OAuth2请求,例如TokenEndpointAuthenticationFilter、OAuth2AuthenticationProcessingFilter等。 Spring Security OAuth2的异常处理机制非常完善,针对OAuth2规范中定义的各种错误情况都有相应的处理。
-
Spring Security 源码阅读笔记 Spring Security 源码阅读笔记 一、核心架构概述 Spring Security的核心是基于过滤器链(Filter Chain)的认证和授权机制。通过分析源码,我们可以看到它的主要组件和执行流程。 1.1 核心组件 SecurityContextHolder: 安全上下文的存储策略 Authentication: 认证信息的抽象 AuthenticationManager: 认证管理器 SecurityFilterChain: 安全过滤器链 UserDetailsService: 用户信息获取服务 PasswordEncoder: 密码编码器 AccessDecisionManager: 访问决策管理器 二、认证流程源码分析 2.1 SecurityContextHolder public class SecurityContextHolder { private static final ThreadLocal<SecurityContext> contextHolder = new ThreadLocal<>(); public static SecurityContext getContext() { SecurityContext ctx = contextHolder.get(); if (ctx == null) { ctx = createEmptyContext(); contextHolder.set(ctx); } return ctx; } // 其它方法... } SecurityContextHolder负责存储当前用户的安全上下文,默认使用ThreadLocal存储,确保每个线程都有独立的安全上下文。 2.2 UsernamePasswordAuthenticationFilter public class UsernamePasswordAuthenticationFilter extends AbstractAuthenticationProcessingFilter { @Override public Authentication attemptAuthentication(HttpServletRequest request, HttpServletResponse response) throws AuthenticationException { String username = obtainUsername(request); String password = obtainPassword(request); UsernamePasswordAuthenticationToken authRequest = new UsernamePasswordAuthenticationToken(username, password); return this.getAuthenticationManager().authenticate(authRequest); } // 其它方法... } 这个过滤器负责处理表单登录的认证请求,从请求中获取用户名和密码,然后创建认证令牌交给AuthenticationManager处理。 2.3 ProviderManager public class ProviderManager implements AuthenticationManager { private List<AuthenticationProvider> providers; @Override public Authentication authenticate(Authentication authentication) throws AuthenticationException { Class<? extends Authentication> toTest = authentication.getClass(); AuthenticationException lastException = null; for (AuthenticationProvider provider : getProviders()) { if (!provider.supports(toTest)) { continue; } try { Authentication result = provider.authenticate(authentication); if (result != null) { copyDetails(authentication, result); return result; } } catch (AuthenticationException e) { lastException = e; } } if (lastException != null) { throw lastException; } throw new ProviderNotFoundException("No AuthenticationProvider found for " + toTest.getName()); } // 其它方法... } ProviderManager是AuthenticationManager的实现,它委托一系列AuthenticationProvider来处理认证请求。 2.4 DaoAuthenticationProvider public class DaoAuthenticationProvider extends AbstractUserDetailsAuthenticationProvider { private UserDetailsService userDetailsService; private PasswordEncoder passwordEncoder; @Override protected void additionalAuthenticationChecks(UserDetails userDetails, UsernamePasswordAuthenticationToken authentication) throws AuthenticationException { if (authentication.getCredentials() == null) { throw new BadCredentialsException("Bad credentials"); } String presentedPassword = authentication.getCredentials().toString(); if (!passwordEncoder.matches(presentedPassword, userDetails.getPassword())) { throw new BadCredentialsException("Bad credentials"); } } @Override protected UserDetails retrieveUser(String username, UsernamePasswordAuthenticationToken authentication) throws AuthenticationException { try { UserDetails loadedUser = this.getUserDetailsService().loadUserByUsername(username); if (loadedUser == null) { throw new InternalAuthenticationServiceException( "UserDetailsService returned null, which is an interface contract violation"); } return loadedUser; } catch (UsernameNotFoundException notFound) { throw notFound; } catch (Exception repositoryProblem) { throw new InternalAuthenticationServiceException(repositoryProblem.getMessage(), repositoryProblem); } } // 其它方法... } DaoAuthenticationProvider通过UserDetailsService获取用户信息,然后使用PasswordEncoder验证密码。 三、授权流程源码分析 3.1 FilterSecurityInterceptor public class FilterSecurityInterceptor extends AbstractSecurityInterceptor implements Filter { private static final String FILTER_APPLIED = "__spring_security_filterSecurityInterceptor_filterApplied"; @Override public void doFilter(ServletRequest request, ServletResponse response, FilterChain chain) throws IOException, ServletException { invoke(new FilterInvocation(request, response, chain)); } public void invoke(FilterInvocation fi) throws IOException, ServletException { if ((fi.getRequest() != null) && (fi.getRequest().getAttribute(FILTER_APPLIED) != null) && observeOncePerRequest) { fi.getChain().doFilter(fi.getRequest(), fi.getResponse()); } else { if (fi.getRequest() != null && observeOncePerRequest) { fi.getRequest().setAttribute(FILTER_APPLIED, Boolean.TRUE); } InterceptorStatusToken token = super.beforeInvocation(fi); try { fi.getChain().doFilter(fi.getRequest(), fi.getResponse()); } finally { super.finallyInvocation(token); } super.afterInvocation(token, null); } } // 其它方法... } FilterSecurityInterceptor是过滤器链中最后一个过滤器,负责对请求进行访问控制决策。 3.2 AccessDecisionManager public interface AccessDecisionManager { void decide(Authentication authentication, Object object, Collection<ConfigAttribute> configAttributes) throws AccessDeniedException, InsufficientAuthenticationException; boolean supports(ConfigAttribute attribute); boolean supports(Class<?> clazz); } AccessDecisionManager接口定义了授权决策的方法,由具体实现类决定是否允许访问。 3.3 AffirmativeBased public class AffirmativeBased extends AbstractAccessDecisionManager { @Override public void decide(Authentication authentication, Object object, Collection<ConfigAttribute> configAttributes) throws AccessDeniedException { int deny = 0; for (AccessDecisionVoter voter : getDecisionVoters()) { int result = voter.vote(authentication, object, configAttributes); switch (result) { case AccessDecisionVoter.ACCESS_GRANTED: return; case AccessDecisionVoter.ACCESS_DENIED: deny++; break; default: break; } } if (deny > 0) { throw new AccessDeniedException(messages.getMessage( "AbstractAccessDecisionManager.accessDenied", "Access is denied")); } // 如果没有voter投赞成票,根据allowIfAllAbstainDecisions决定是否允许访问 checkAllowIfAllAbstainDecisions(); } // 其它方法... } AffirmativeBased是AccessDecisionManager的一个实现,只要有一个投票器投票通过,就允许访问。 四、过滤器链构建过程 4.1 WebSecurity public final class WebSecurity extends AbstractConfiguredSecurityBuilder<Filter, WebSecurity> implements SecurityBuilder<Filter>, ApplicationContextAware { private List<SecurityFilterChain> securityFilterChains = new ArrayList<>(); @Override protected Filter performBuild() throws Exception { // ... int chainSize = this.securityFilterChains.size(); if (chainSize > 0) { return VirtualFilterChain.createChainProxy(this.securityFilterChains); } // ... } // 其它方法... } WebSecurity负责构建过滤器链。 4.2 HttpSecurity public final class HttpSecurity extends AbstractConfiguredSecurityBuilder<DefaultSecurityFilterChain, HttpSecurity> implements SecurityBuilder<DefaultSecurityFilterChain>, HttpSecurityBuilder<HttpSecurity> { @Override protected DefaultSecurityFilterChain performBuild() { filters.sort(comparator); return new DefaultSecurityFilterChain(requestMatcher, filters); } // 其它方法... } HttpSecurity负责配置单个SecurityFilterChain中的过滤器。 五、常见过滤器解析 在Spring Security中,请求会经过一系列过滤器,下面是一些关键过滤器的源码分析: 5.1 SecurityContextPersistenceFilter public class SecurityContextPersistenceFilter extends GenericFilterBean { @Override public void doFilter(ServletRequest req, ServletResponse res, FilterChain chain) throws IOException, ServletException { HttpServletRequest request = (HttpServletRequest) req; HttpServletResponse response = (HttpServletResponse) res; HttpRequestResponseHolder holder = new HttpRequestResponseHolder(request, response); SecurityContext contextBeforeChainExecution = repo.loadContext(holder); try { SecurityContextHolder.setContext(contextBeforeChainExecution); chain.doFilter(holder.getRequest(), holder.getResponse()); } finally { SecurityContext contextAfterChainExecution = SecurityContextHolder.getContext(); SecurityContextHolder.clearContext(); repo.saveContext(contextAfterChainExecution, holder.getRequest(), holder.getResponse()); } } // 其它方法... } SecurityContextPersistenceFilter负责在请求处理前加载SecurityContext,在请求处理后保存SecurityContext。 5.2 LogoutFilter public class LogoutFilter extends GenericFilterBean { @Override public void doFilter(ServletRequest req, ServletResponse res, FilterChain chain) throws IOException, ServletException { HttpServletRequest request = (HttpServletRequest) req; HttpServletResponse response = (HttpServletResponse) res; if (requiresLogout(request, response)) { Authentication auth = SecurityContextHolder.getContext().getAuthentication(); if (logger.isDebugEnabled()) { logger.debug("Logging out user '" + auth + "' and transferring to logout destination"); } this.handler.logout(request, response, auth); logoutSuccessHandler.onLogoutSuccess(request, response, auth); return; } chain.doFilter(request, response); } // 其它方法... } LogoutFilter处理用户退出登录的请求。 六、注解式安全配置实现原理 6.1 @EnableWebSecurity @Retention(value = java.lang.annotation.RetentionPolicy.RUNTIME) @Target(value = { java.lang.annotation.ElementType.TYPE }) @Documented @Import({ WebSecurityConfiguration.class, SpringWebMvcImportSelector.class, OAuth2ImportSelector.class, HttpSecurityConfiguration.class }) @EnableGlobalAuthentication @Configuration public @interface EnableWebSecurity { boolean debug() default false; } @EnableWebSecurity导入了WebSecurityConfiguration等配置类。 6.2 WebSecurityConfiguration @Configuration(proxyBeanMethods = false) public class WebSecurityConfiguration { @Bean(name = AbstractSecurityWebApplicationInitializer.DEFAULT_FILTER_NAME) public Filter springSecurityFilterChain() throws Exception { boolean hasConfigurers = webSecurityConfigurers != null && !webSecurityConfigurers.isEmpty(); if (!hasConfigurers) { WebSecurityConfigurerAdapter adapter = objectObjectPostProcessor.postProcess(new WebSecurityConfigurerAdapter() {}); webSecurity.apply(adapter); } for (SecurityConfigurer<Filter, WebSecurity> webSecurityConfigurer : webSecurityConfigurers) { webSecurity.apply(webSecurityConfigurer); } return webSecurity.build(); } // 其它方法... } WebSecurityConfiguration负责创建springSecurityFilterChain。 6.3 @PreAuthorize源码 @Target({ ElementType.METHOD, ElementType.TYPE }) @Retention(RetentionPolicy.RUNTIME) @Inherited @Documented @Repeatable(PreAuthorizes.class) public @interface PreAuthorize { String value(); } @PreAuthorize是方法级的安全注解,用于指定访问控制表达式。 6.4 MethodSecurityInterceptor public class MethodSecurityInterceptor extends AbstractSecurityInterceptor implements MethodInterceptor { @Override public Object invoke(MethodInvocation mi) throws Throwable { InterceptorStatusToken token = super.beforeInvocation(mi); Object result; try { result = mi.proceed(); } finally { super.finallyInvocation(token); } return super.afterInvocation(token, result); } // 其它方法... } MethodSecurityInterceptor拦截带有安全注解的方法调用,进行访问控制决策。 七、OAuth2集成源码分析 7.1 OAuth2LoginConfigurer public final class OAuth2LoginConfigurer<B extends HttpSecurityBuilder<B>> extends AbstractAuthenticationFilterConfigurer<B, OAuth2LoginConfigurer<B>, OAuth2LoginAuthenticationFilter> { @Override public void init(B http) throws Exception { OAuth2LoginAuthenticationFilter authenticationFilter = new OAuth2LoginAuthenticationFilter( this.authorizationRequestRepository, this.authorizationRequestRepository); authenticationFilter.setAuthenticationManager( this.authenticationManager(http)); // 设置各种属性... this.setAuthenticationFilter(authenticationFilter); super.init(http); } // 其它方法... } OAuth2LoginConfigurer配置OAuth2登录流程。 7.2 OAuth2AuthorizationRequestRedirectFilter public class OAuth2AuthorizationRequestRedirectFilter extends OncePerRequestFilter { @Override protected void doFilterInternal(HttpServletRequest request, HttpServletResponse response, FilterChain filterChain) throws ServletException, IOException { String registrationId = this.resolveRegistrationId(request); if (registrationId == null) { filterChain.doFilter(request, response); return; } ClientRegistration clientRegistration = this.clientRegistrationRepository.findByRegistrationId(registrationId); if (clientRegistration == null) { throw new IllegalArgumentException("Invalid Client Registration with Id: " + registrationId); } OAuth2AuthorizationRequest authorizationRequest = this.authorizationRequestResolver .resolve(request, clientRegistration); if (authorizationRequest == null) { throw new IllegalStateException( "Unable to resolve OAuth2 Authorization Request for Client Registration: " + registrationId); } this.authorizationRequestRepository.saveAuthorizationRequest(authorizationRequest, request, response); URI redirectUri = URI.create(authorizationRequest.getAuthorizationRequestUri()); this.authorizationRedirectStrategy.sendRedirect(request, response, redirectUri.toString()); } // 其它方法... } OAuth2AuthorizationRequestRedirectFilter负责处理OAuth2授权请求的重定向。 八、总结与心得 通过对Spring Security源码的阅读和分析,我对其核心工作流程有了更深入的理解: 安全过滤器链是Spring Security的核心,它通过一系列过滤器来处理HTTP请求的安全性。 认证流程主要通过AuthenticationManager和AuthenticationProvider来实现,支持多种认证方式。 授权决策由AccessDecisionManager负责,通过投票机制来决定是否允许访问。 Spring Security的配置非常灵活,可以通过Java配置、XML配置或注解来实现。 Spring Security与OAuth2的集成是通过专门的过滤器和配置类来实现的。