搜索到
18
篇与
的结果
-
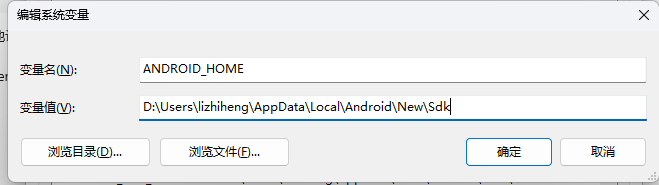
 WebDriverIO与Appium本地开发环境部署(随手记) WebDriverIO与Appium本地开发环境部署 WebDriverIO V8 Appium 需要环境 浏览器:FireFox、Chrome Android环境:Android Studio、adb、Andorid SDK 配置Android环境变量 配置ANDROID_HOME ,Android SDK根据自己本地的地址来 配置环境变量 %ANDROID_HOME%\platform-tools %ANDROID_HOME%\emulator %ANDROID_HOME%\tools\bin 创建一个虚拟机在控制台验证 控制台输入adb devices 安装appium server 客户端 地址:https://github.com/appium/appium-desktop 安装完运行 默认Port:4723 配置Host:127.0.0.1 点击Edit Configurations 配置ANDROID_HOME 保存并重启 根据自己的Android SDK目录配置,如果这里没有配置,系统环境变量也是没有用的 安装appium cli node version: >20.18.1 npm i -g appium WebDriverIO 各个浏览器需要的驱动 chromeDriver各个版本的驱动下载地址 https://www.cnblogs.com/aiyablog/articles/17948703 最新版本的chromeDriver的下载地址 https://googlechromelabs.github.io/chrome-for-testing/ 在浏览器chrome测试,需要浏览器的版本跟chromeDriver对应 edge 的驱动无法下载,需要离线下载 小程序自动化测试 环境配置:开启微信开发者工具服务端口 点击=》设置=》安全设置
 -
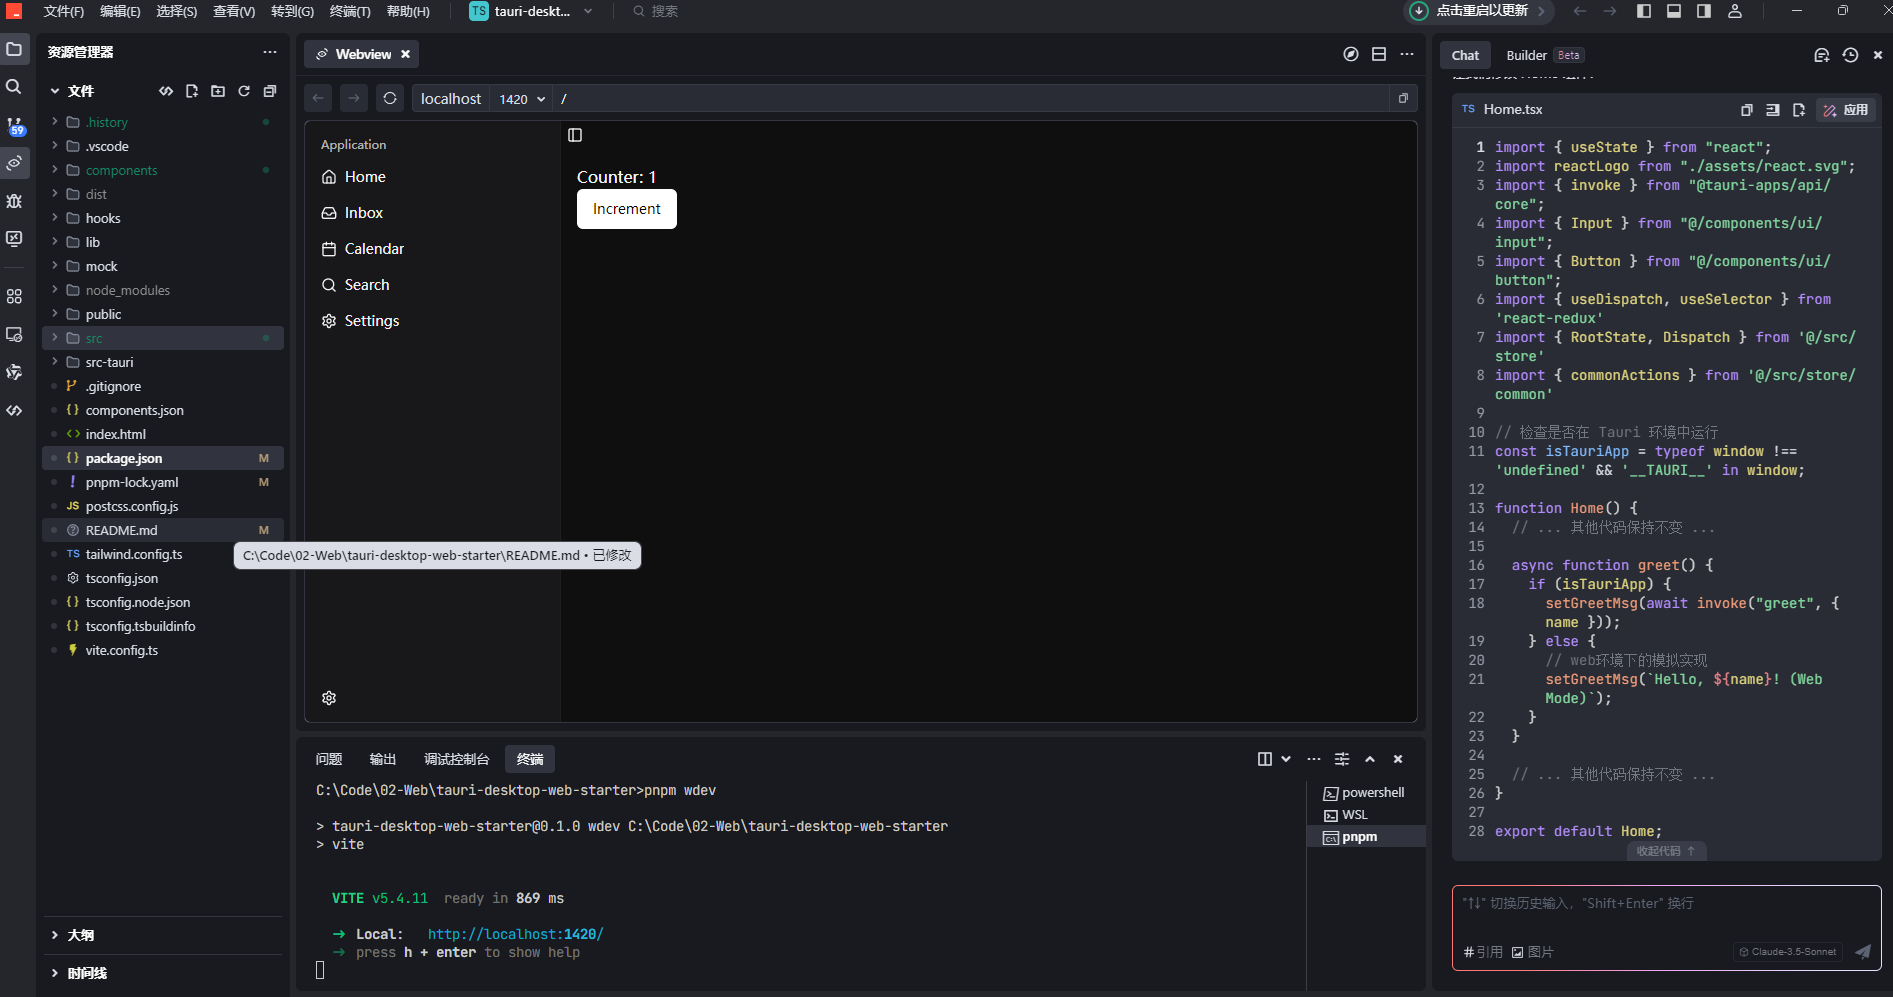
Tauri2.0尝鲜-正式版脚手架搭建 Tauri 2.0正式版脚手架搭建 Tauri已经迅速成为使用Web技术构建轻量级、安全桌面应用的最受欢迎框架之一。随着Tauri 2.0正式版的发布,现在是探索如何搭建一个生产就绪的脚手架的最佳时机,该脚手架提供了专业桌面应用开发所需的所有工具。 在本文中,我将介绍一个完整的Tauri启动模板,它支持Web和桌面双环境运行,采用现代React + TypeScript技术栈,并包含构建精美、生产就绪应用程序所需的所有基本工具。 为什么选择Tauri 2.0? 在深入探讨我们的脚手架之前,让我们快速回顾一下Tauri 2.0的特点: 更小的打包体积:Tauri应用比Electron替代方案显著更小 增强的安全性:基于Rust的安全原则,采用严格的权限模型 更好的性能:更低的内存消耗和更快的启动时间 多平台支持:从单一代码库为Windows、macOS和Linux构建应用 Web/桌面统一:相同的代码库可以同时作为Web应用和桌面应用运行 随着Tauri 2.0的发布,这些优势得到了增强,包括改进的API、更好的开发体验和更强大的跨平台兼容性。 Tauri桌面Web启动模板介绍 我们将要探索的脚手架为Tauri 2.0应用程序提供了全面的基础。它结合了现代前端技术和Tauri的Rust后端能力,为Web和桌面环境提供了优化的开发体验。 技术栈 我们的启动模板汇集了一流的技术: 核心框架:Tauri 2.0 + Vite + React + TypeScript UI组件:Tailwind CSS + Shadcn UI + Lucide Icons 状态管理:Redux Toolkit 国际化:i18n 后端:Rust 开发工具:用于API模拟的Mock服务 这种组合提供了性能、开发体验和功能完整性的完美平衡。 主要特性 该脚手架具有多项功能,使开发更加顺畅高效: 开箱即用的工程配置:跳过繁琐的设置过程 深色/浅色主题切换:内置主题支持,包括系统主题检测 自定义窗口标题栏:Windows和macOS风格选项 状态管理最佳实践:组织良好的Redux实现 类型安全:完整的TypeScript集成 国际化:开箱即用的多语言支持 Mock数据支持:开发过程中不依赖后端服务 项目结构 了解项目结构对于有效开发至关重要。我们的脚手架遵循清晰合理的组织方式: tauri-desktop-web-starter/ ├── components/ # 公共UI组件 ├── hooks/ # 自定义React Hooks ├── lib/ # 工具库和配置 ├── src/ # 前端源代码 │ ├── assets/ # 静态资源 │ ├── models/ # 数据模型定义 │ ├── pages/ # 页面组件 │ ├── store/ # Redux状态管理 │ │ ├── common/ # 通用状态 │ │ └── index.ts # Store配置 │ ├── translations/ # 国际化文件 │ ├── utils/ # 工具函数 │ │ └── mock/ # Mock服务 │ ├── Home.tsx # 主页组件 │ └── main.tsx # 入口文件 ├── src-tauri/ # Tauri/Rust后端代码 ├── public/ # 公共资源 ├── package.json # 项目依赖配置 ├── postcss.config.js # PostCSS配置 ├── tailwind.config.ts # Tailwind CSS配置 ├── tsconfig.json # TypeScript配置 ├── tsconfig.node.json # Node环境TypeScript配置 └── vite.config.ts # Vite配置 这种组织方式促进了关注点的清晰分离,使应用程序的不同部分易于定位和操作。 开始使用 让我们来看看如何为您自己的项目设置和使用这个脚手架。 环境准备 在开始之前,确保已安装以下工具: Rust:Tauri后端的基础 curl --proto '=https' --tlsv1.2 -sSf https://sh.rustup.rs | sh Node.js:前端JavaScript环境 pnpm:我们选择的包管理器,提供更快、更高效的依赖管理 npm install -g pnpm Tauri CLI:Tauri开发必备 cargo install tauri-cli 开发工作流 安装好先决条件后,可以开始开发: 安装依赖: pnpm install 启动开发服务器: 桌面应用开发: pnpm dev Web开发: pnpm wdev 这种双环境支持允许您在两种环境中开发和测试应用程序。 构建应用程序: 桌面应用打包: pnpm tauri build Web应用构建: pnpm build 功能展示 启动模板开箱即带有精美的UI,包括对不同主题的支持: 浅色主题,提供清晰明亮的界面 深色主题,减少眼睛疲劳,呈现现代美感 系统主题检测,匹配用户偏好 自定义标题栏,符合各操作系统的设计指南 IDE推荐配置 为获得最佳开发体验,我们推荐使用: VS Code 并安装以下扩展: Tauri扩展,增强Tauri开发 rust-analyzer,提供Rust代码智能 这种组合提供了智能代码补全、内联错误检测以及其他特定于Tauri和Rust开发的生产力功能。 自定义和扩展 脚手架设计为易于自定义。以下是您可能想要进行的一些常见自定义: 添加新UI组件:放置在components目录中 创建新页面:添加到src/pages目录 扩展状态管理:向Redux存储添加新的切片 添加Rust功能:使用自定义Rust代码增强src-tauri后端 设置新主题:在Tailwind中修改主题配置
-
基于 Taro 技术栈搭建的跨端客户端脚手架 基于 Taro 技术栈搭建的跨端客户端脚手架 一、项目背景 接手的项目各个技术栈不同,有原生微信小程序,有flutter开发的客户端,有uniapp开发的客户端,现在想统一技术栈,为什么选择Taro不是uniapp,主要是因为ReactNative。 二、技术栈选型 Taro 3.x:京东凹凸实验室开源的跨端开发框架 React 18:用于构建用户界面的 JavaScript 库 TypeScript:添加了类型系统的 JavaScript 超集 NutUI:京东风格的轻量级移动端组件库 Redux Toolkit:Redux 官方推荐的工具集 Pnpm:高性能的包管理工具 三、项目结构设计 ├── config # 项目配置文件 │ ├── dev.js # 开发环境配置 │ ├── index.js # 基础配置 │ └── prod.js # 生产环境配置 ├── src # 源码目录 │ ├── api # API 接口 │ ├── assets # 静态资源 │ ├── components # 公共组件 │ ├── constants # 常量定义 │ ├── models # 模型定义 │ ├── hooks # 自定义 Hooks │ ├── pages # 页面文件 │ ├── service # 业务处理 │ ├── store # 状态管理 │ ├── types # TypeScript 类型定义 │ ├── utils # 工具函数 │ └── app.tsx # 应用入口 四、关键技术实现 1. 多端适配策略 // 条件编译示例 import { Platform } from '@tarojs/service' // #ifdef WEAPP console.log('微信小程序环境') // #endif // #ifdef TT console.log('抖音小程序环境') // #endif 2. 状态管理方案 // store/index.ts import { configureStore } from '@reduxjs/toolkit' import userReducer from './slices/user' export const store = configureStore({ reducer: { user: userReducer } }) 3. 网络请求封装 // utils/request.ts import Taro from '@tarojs/taro' const request = async (options) => { try { const response = await Taro.request({ url: BASE_URL + options.url, method: options.method, data: options.data, header: { 'content-type': 'application/json', ...options.header } }) return response.data } catch (error) { console.error('请求错误:', error) throw error } } 五、最佳实践与注意事项 1. 组件库使用规范 NutUI 图标组件引入顺序问题 // ✅ 正确示例 import { ArrowRight } from '@nutui/icons-react-taro' import { Button } from '@nutui/nutui-react-taro' // ❌ 错误示例 import { Button } from '@nutui/nutui-react-taro' import { ArrowRight } from '@nutui/icons-react-taro' 2. 平台差异处理 抖音小程序 AbortController 兼容性问题 微信小程序热重载配置注意事项 3.注意点 如果报如下警告 despite it was not able to fulfill desired ordering with these modules: * css ./node_modules/.pnpm/css-loader@7.1.2_webpack@5.78.0_@swc+core@1.3.96_/node_modules/css-loader/dist/cjs.js ??ruleSet[1].rules[4].oneOf[0] .use[1]!./node_modules/.pnpm/postcss-loader@8.1.1_postcss@8.4.49_typescript@5.7.3_webpack@5.78.0_@swc+core@1.3.96_/node_modules/postcss-loader/dist/cjs.js ??ruleSet[1].rules[4].oneOf[0] .use[2]!./node_modules/.pnpm/@nutui+icons-react-taro@2.0.1/node_modules/@nutui/icons-react-taro/dist/style_icon.css - couldn't fulfill desired order of chunk group(s) pages/user/index - while fulfilling desired order of chunk group(s) pages/index/index, pages/category/index, pages/order/index 原因是 import { ArrowRight } from '@nutui/icons-react-taro' import引入顺序有问题,因为在这个语句的前面有引入其他的组件,其他的组件里也使用了@nutui/icons-react-taro,所以会报这个警告,只需要把import { ArrowRight } from '@nutui/icons-react-taro'放到最前面就可以了。 4.坑点 taro的mock插件没有适配最新版,不能新建mock目录,已经适配了最新版的插件可自行编译https://github.com/javajeans/taro-plugin-mock 六、构建与部署 # 安装依赖 pnpm install # 开发环境 pnpm dev:weapp # 微信小程序 pnpm dev:tt # 抖音小程序 pnpm dev:h5 # H5 # 生产环境 pnpm build:weapp pnpm build:tt pnpm build:h5 七、性能优化建议 合理使用条件编译 组件按需加载 图片资源压缩 避免不必要的重渲染 八、总结 通过 Taro 技术栈,我们成功搭建了一套可维护、可扩展的跨端开发脚手架。该脚手架具有以下特点: 统一的开发体验 完善的工程化配置 规范的代码风格 丰富的组件库支持 灵活的状态管理
-
Spring Security OAuth2在微前端架构下实现统一退出 Spring Security OAuth2在微前端架构下实现统一退出 在微前端架构中,当一个应用退出登录时,实现所有应用同步退出的功能是一个常见需求。这个问题主要源于微前端架构下各个子应用之间的分离特性,导致一个应用注销后,其他应用仍保持登录状态。下面我将详细介绍如何解决这个问题。 问题分析 微前端架构下,登出问题主要有以下几个原因: 各子应用可能使用独立的会话管理 OAuth2 token可能在各应用中独立存储 缺乏统一的退出机制来协调各个子应用 解决方案 1. 实现单点登出(Single Sign-Out) @RestController public class LogoutController { private final TokenStore tokenStore; private final ClientRegistrationRepository clientRegistrationRepository; public LogoutController(TokenStore tokenStore, ClientRegistrationRepository clientRegistrationRepository) { this.tokenStore = tokenStore; this.clientRegistrationRepository = clientRegistrationRepository; } @PostMapping("/api/logout") public ResponseEntity<Map<String, String>> logout( @RequestParam(value = "token", required = false) String token, HttpServletRequest request, HttpServletResponse response, @AuthenticationPrincipal OAuth2User principal) { // 获取当前认证信息 Authentication auth = SecurityContextHolder.getContext().getAuthentication(); // 如果存在认证信息,则进行处理 if (auth != null) { // 撤销token if (auth instanceof OAuth2AuthenticationToken) { OAuth2AuthenticationToken oauthToken = (OAuth2AuthenticationToken) auth; String clientRegistrationId = oauthToken.getAuthorizedClientRegistrationId(); // 根据需要调用OAuth2服务器的撤销接口 revokeToken(clientRegistrationId, token); } // 清除安全上下文 SecurityContextHolder.clearContext(); // 使session失效 HttpSession session = request.getSession(false); if (session != null) { session.invalidate(); } // 清除相关cookie deleteCookies(request, response); } Map<String, String> result = new HashMap<>(); result.put("message", "成功退出登录"); return ResponseEntity.ok(result); } private void revokeToken(String clientRegistrationId, String token) { try { ClientRegistration clientRegistration = clientRegistrationRepository.findByRegistrationId(clientRegistrationId); if (clientRegistration != null && token != null) { // 根据OAuth2服务器提供的撤销端点进行token撤销 String revokeEndpoint = clientRegistration.getProviderDetails().getConfigurationMetadata().get("revocation_endpoint").toString(); RestTemplate restTemplate = new RestTemplate(); HttpHeaders headers = new HttpHeaders(); headers.setContentType(MediaType.APPLICATION_FORM_URLENCODED); MultiValueMap<String, String> map = new LinkedMultiValueMap<>(); map.add("token", token); map.add("client_id", clientRegistration.getClientId()); map.add("client_secret", clientRegistration.getClientSecret()); HttpEntity<MultiValueMap<String, String>> request = new HttpEntity<>(map, headers); restTemplate.postForEntity(revokeEndpoint, request, String.class); } } catch (Exception e) { // 处理可能的异常 logger.error("撤销token失败", e); } } private void deleteCookies(HttpServletRequest request, HttpServletResponse response) { Cookie[] cookies = request.getCookies(); if (cookies != null) { for (Cookie cookie : cookies) { // 删除认证相关的cookie if (cookie.getName().startsWith("OAUTH2_") || cookie.getName().equals("JSESSIONID") || cookie.getName().equals("SESSION")) { Cookie newCookie = new Cookie(cookie.getName(), null); newCookie.setPath("/"); newCookie.setMaxAge(0); newCookie.setHttpOnly(true); response.addCookie(newCookie); } } } } } 2. 创建统一的登出前端服务 // auth-service.js export class AuthService { constructor() { this.logoutListeners = []; this.setupLogoutListener(); } // 添加登出监听器 addLogoutListener(callback) { this.logoutListeners.push(callback); return () => { this.logoutListeners = this.logoutListeners.filter(cb => cb !== callback); }; } // 发送登出事件到所有注册的应用 notifyLogout() { // 通过BroadcastChannel发送消息 const bc = new BroadcastChannel('auth-logout-channel'); bc.postMessage({ type: 'LOGOUT' }); bc.close(); // 同时触发监听器 this.logoutListeners.forEach(callback => callback()); } // 监听其他应用的登出事件 setupLogoutListener() { const bc = new BroadcastChannel('auth-logout-channel'); bc.onmessage = (event) => { if (event.data.type === 'LOGOUT') { // 执行本地登出操作 this.logout(false); // 不广播,避免循环 } }; } // 登出方法 async logout(broadcast = true) { try { // 调用后端登出API const response = await fetch('/api/logout', { method: 'POST', credentials: 'include', headers: { 'Content-Type': 'application/json' } }); if (response.ok) { // 清除本地存储 localStorage.removeItem('oauth2_token'); sessionStorage.removeItem('oauth2_token'); // 清除相关cookie this.clearAuthCookies(); // 通知其他应用 if (broadcast) { this.notifyLogout(); } return true; } else { console.error('登出失败:', await response.text()); return false; } } catch (error) { console.error('登出过程中发生错误:', error); return false; } } // 清除认证相关cookie clearAuthCookies() { const cookies = document.cookie.split(';'); for (let i = 0; i < cookies.length; i++) { const cookie = cookies[i]; const eqPos = cookie.indexOf('='); const name = eqPos > -1 ? cookie.substring(0, eqPos).trim() : cookie.trim(); if (name.startsWith('OAUTH2_') || name === 'JSESSIONID' || name === 'SESSION') { document.cookie = `${name}=;path=/;expires=Thu, 01 Jan 1970 00:00:00 GMT`; } } } // 检查是否已登录 isAuthenticated() { // 根据实际存储方式检查认证状态 return localStorage.getItem('oauth2_token') !== null || sessionStorage.getItem('oauth2_token') !== null; } } // 导出单例 export const authService = new AuthService(); 3. 创建主应用的登出组件 // LogoutButton.jsx (React组件示例) import React from 'react'; import { authService } from './auth-service'; const LogoutButton = () => { const handleLogout = async () => { const success = await authService.logout(); if (success) { // 重定向到登录页或首页 window.location.href = '/login'; } else { alert('登出失败,请重试'); } }; return ( <button className="logout-button" onClick={handleLogout} > 退出登录 </button> ); }; export default LogoutButton; 4. 为各个微前端应用添加登出监听 // 在每个子应用的入口文件中添加 import { authService } from 'shared-lib/auth-service'; class MicroApp { constructor() { this.init(); } init() { // 注册登出监听器 this.unsubscribeLogout = authService.addLogoutListener(() => { // 当收到登出事件时,清理本地状态 this.handleLogout(); }); // 监听卸载事件,移除监听器 window.addEventListener('unload', () => { if (this.unsubscribeLogout) { this.unsubscribeLogout(); } }); // 设置全局登出处理方法 window.microAppLogout = () => { authService.logout(); }; } handleLogout() { // 清理本地存储 localStorage.removeItem('app_state'); sessionStorage.removeItem('app_state'); // 重置应用状态 this.resetAppState(); // 可选:重定向到登录页 window.location.href = '/login'; } resetAppState() { // 重置应用状态逻辑 // ... } } // 初始化应用 const app = new MicroApp(); 5. 使用Redis实现会话共享 为了确保后端会话的统一管理,应使用Redis存储会话: @Configuration @EnableRedisHttpSession public class RedisSessionConfig { @Bean public RedisTemplate<String, Object> redisTemplate(RedisConnectionFactory connectionFactory) { RedisTemplate<String, Object> template = new RedisTemplate<>(); template.setConnectionFactory(connectionFactory); // 使用Jackson2为序列化和反序列化 Jackson2JsonRedisSerializer<Object> serializer = new Jackson2JsonRedisSerializer<>(Object.class); ObjectMapper mapper = new ObjectMapper(); mapper.setVisibility(PropertyAccessor.ALL, JsonAutoDetect.Visibility.ANY); mapper.activateDefaultTyping( LaissezFaireSubTypeValidator.instance, ObjectMapper.DefaultTyping.NON_FINAL, JsonTypeInfo.As.PROPERTY ); serializer.setObjectMapper(mapper); template.setKeySerializer(new StringRedisSerializer()); template.setValueSerializer(serializer); template.setHashKeySerializer(new StringRedisSerializer()); template.setHashValueSerializer(serializer); template.afterPropertiesSet(); return template; } @Bean public HttpSessionIdResolver httpSessionIdResolver() { // 使用Cookie和Header双重策略,提高灵活性 return new CookieAndHeaderHttpSessionIdResolver(); } } // 自定义会话ID解析器,支持Cookie和Header class CookieAndHeaderHttpSessionIdResolver implements HttpSessionIdResolver { private static final String HEADER_NAME = "X-Auth-Token"; private final CookieHttpSessionIdResolver cookieResolver = new CookieHttpSessionIdResolver(); private final HeaderHttpSessionIdResolver headerResolver = HeaderHttpSessionIdResolver.xAuthToken(); @Override public List<String> resolveSessionIds(HttpServletRequest request) { List<String> sessionIds = cookieResolver.resolveSessionIds(request); if (sessionIds.isEmpty()) { sessionIds = headerResolver.resolveSessionIds(request); } return sessionIds; } @Override public void setSessionId(HttpServletRequest request, HttpServletResponse response, String sessionId) { cookieResolver.setSessionId(request, response, sessionId); headerResolver.setSessionId(request, response, sessionId); } @Override public void expireSession(HttpServletRequest request, HttpServletResponse response) { cookieResolver.expireSession(request, response); headerResolver.expireSession(request, response); } } 6. 实现OAuth2统一退出端点 为了完全支持OAuth2退出,还需要实现一个注销端点连接到OAuth2服务器: @Configuration public class OAuth2LogoutConfig { private final ClientRegistrationRepository clientRegistrationRepository; public OAuth2LogoutConfig(ClientRegistrationRepository clientRegistrationRepository) { this.clientRegistrationRepository = clientRegistrationRepository; } @Bean public SecurityFilterChain securityFilterChain(HttpSecurity http) throws Exception { http .authorizeHttpRequests(authorize -> authorize .requestMatchers("/api/public/**", "/login", "/oauth2/authorization/**").permitAll() .anyRequest().authenticated() ) .oauth2Login(oauth2 -> oauth2 .loginPage("/login") .defaultSuccessUrl("/dashboard") ) .logout(logout -> logout .logoutUrl("/api/logout") .logoutSuccessHandler(this.oidcLogoutSuccessHandler()) .invalidateHttpSession(true) .clearAuthentication(true) .deleteCookies("JSESSIONID", "SESSION") ); return http.build(); } private LogoutSuccessHandler oidcLogoutSuccessHandler() { OidcClientInitiatedLogoutSuccessHandler oidcLogoutSuccessHandler = new OidcClientInitiatedLogoutSuccessHandler(this.clientRegistrationRepository); // 设置退出后的重定向URL oidcLogoutSuccessHandler.setPostLogoutRedirectUri("{baseUrl}/login?logout=success"); return (request, response, authentication) -> { // 获取会话中的信息用于撤销token等操作 HttpSession session = request.getSession(false); if (session != null) { String idToken = (String) session.getAttribute("id_token"); if (idToken != null && authentication instanceof OAuth2AuthenticationToken) { OAuth2AuthenticationToken oauthToken = (OAuth2AuthenticationToken) authentication; ClientRegistration clientRegistration = this.clientRegistrationRepository .findByRegistrationId(oauthToken.getAuthorizedClientRegistrationId()); // 尝试撤销令牌 try { revokeTokens(clientRegistration, request); } catch (Exception e) { // 记录错误但继续退出流程 e.printStackTrace(); } } } // 调用OIDC退出处理器 oidcLogoutSuccessHandler.onLogoutSuccess(request, response, authentication); }; } private void revokeTokens(ClientRegistration clientRegistration, HttpServletRequest request) { // 实现令牌撤销逻辑 HttpSession session = request.getSession(false); if (session != null && clientRegistration != null) { String accessToken = (String) session.getAttribute("access_token"); String refreshToken = (String) session.getAttribute("refresh_token"); if (accessToken != null || refreshToken != null) { // 检查是否有撤销端点配置 Object revocationUri = clientRegistration.getProviderDetails() .getConfigurationMetadata().get("revocation_endpoint"); if (revocationUri != null) { RestTemplate restTemplate = new RestTemplate(); HttpHeaders headers = new HttpHeaders(); headers.setContentType(MediaType.APPLICATION_FORM_URLENCODED); headers.setBasicAuth(clientRegistration.getClientId(), clientRegistration.getClientSecret()); // 撤销访问令牌 if (accessToken != null) { MultiValueMap<String, String> body = new LinkedMultiValueMap<>(); body.add("token", accessToken); body.add("token_type_hint", "access_token"); HttpEntity<MultiValueMap<String, String>> entity = new HttpEntity<>(body, headers); restTemplate.postForEntity(revocationUri.toString(), entity, String.class); } // 撤销刷新令牌 if (refreshToken != null) { MultiValueMap<String, String> body = new LinkedMultiValueMap<>(); body.add("token", refreshToken); body.add("token_type_hint", "refresh_token"); HttpEntity<MultiValueMap<String, String>> entity = new HttpEntity<>(body, headers); restTemplate.postForEntity(revocationUri.toString(), entity, String.class); } } } } } } 实现要点解析 统一后端登出端点 清除服务器端会话 撤销OAuth2令牌 删除相关Cookie 通知OAuth2授权服务器 前端统一登出机制 使用BroadcastChannel进行跨应用通信 共享认证服务实现登出状态同步 提供全局登出方法 使用Redis共享会话 确保所有后端服务访问相同的会话存储 支持会话的快速失效 前端存储清理 清除localStorage和sessionStorage中的认证信息 删除认证相关Cookie 最佳实践 使用OpenID Connect(OIDC)标准 利用OIDC的标准登出流程 实现前后端退出的协调 使用统一的会话ID 为所有微前端应用使用相同的会话标识 避免使用多种会话管理方式 实现健壮的错误处理 当部分退出流程失败时仍能完成整体退出 提供清晰的用户反馈 安全考虑 确保退出端点的安全访问 防止CSRF攻击 结论 通过上述方案的实现,可以确保微前端架构下的统一退出机制,使得用户在任一子应用退出后,所有应用都同步退出登录状态。这种方案既保证了用户体验的一致性,也提高了系统的安全性,避免了部分应用仍保持登录状态可能带来的安全风险。 刚好再学react,就用react写前端了
-
React-Native学习笔记 React-Native学习笔记 起步注意 不要使用别人的demo code做练习,因为react-native更新很快,第三方插件更新也很快,如果你使用的是最新版本,别人代码嵌入你自己的demo将举步维艰。 基础看完重点放在官方插件上。 react-navigation重点:一般搭建app基础工程,app肯定需要导航,路由等,官方推荐react-navigation。注意线上中文相关文档帖子大部分都是3.*之前的版本,按其安装会报一些错,下面碰到的几个列一下。 常规错误 Failed to load bundle(http://localhost:8081/index.bundle?platform=ios&dev=true&minify=false) with error:(Unable to resolve module `react-native-gesture-handler` from `/Users/apple/Code/04-IOS/pixeleye/node_modules/@react-navigation/native/src/Scrollables.js`: Module `react-native-gesture-handler` does not exist in the Haste module map This might be related to https://github.com/facebook/react-native/issues/4968 To resolve try the following: 1. Clear watchman watches: `watchman watch-del-all`. 2. Delete the `node_modules` folder: `rm -rf node_modules && npm install`. 3. Reset Metro Bundler cache: `rm -rf /tmp/metro-bundler-cache-*` or `npm start -- --reset-cache`. 4. Remove haste cache: `rm -rf /tmp/haste-map-react-native-packager-*`. (null)) __38-[RCTCxxBridge loadSource:onProgress:]_block_invoke.228 RCTCxxBridge.mm:414 ___ZL36attemptAsynchronousLoadOfBundleAtURLP5NSURLU13block_pointerFvP18RCTLoadingProgressEU13block_pointerFvP7NSErrorP9RCTSourceE_block_invoke.118 __80-[RCTMultipartDataTask URLSession:streamTask:didBecomeInputStream:outputStream:]_block_invoke -[RCTMultipartStreamReader emitChunk:headers:callback:done:] -[RCTMultipartStreamReader readAllPartsWithCompletionCallback:progressCallback:] -[RCTMultipartDataTask URLSession:streamTask:didBecomeInputStream:outputStream:] __88-[NSURLSession delegate_streamTask:didBecomeInputStream:outputStream:completionHandler:]_block_invoke __NSBLOCKOPERATION_IS_CALLING_OUT_TO_A_BLOCK__ -[NSBlockOperation main] -[__NSOperationInternal _start:] __NSOQSchedule_f _dispatch_call_block_and_release _dispatch_client_callout _dispatch_continuation_pop _dispatch_async_redirect_invoke _dispatch_root_queue_drain _dispatch_worker_thread2 _pthread_wqthread start_wqthread 如果是react-navigation相关的,原因是没有安装react-native-gesture-handler,安装即可。 npm install --save react-native-gesture-handler 重新编译。 Unhandled JS Exception: undefined is not an object (evaluating '_react.default.PropTypes.string') RCTFatal -[RCTExceptionsManager reportFatalException:stack:exceptionId:] __invoking___ -[NSInvocation invoke] -[NSInvocation invokeWithTarget:] -[RCTModuleMethod invokeWithBridge:module:arguments:] facebook::react::invokeInner(RCTBridge*, RCTModuleData*, unsigned int, folly::dynamic const&) facebook::react::RCTNativeModule::invoke(unsigned int, folly::dynamic&&, int)::$_0::operator()() const invocation function for block in facebook::react::RCTNativeModule::invoke(unsigned int, folly::dynamic&&, int) _dispatch_call_block_and_release _dispatch_client_callout _dispatch_lane_serial_drain _dispatch_lane_invoke _dispatch_workloop_worker_thread _pthread_wqthread start_wqthread 新版本prop-types独立出来,如果使用就接口会找不到,需要安装对应插件。 npm install prop-types --save react-navigation注意事项 避免导航器内部的screen在渲染另一个导航器。 参考https://reactnavigation.org/docs/en/common-mistakes.html说明。如果确实需要这么使用在组件标签内需要添加navigation={this.props.navigation}。 如果将AppContainer包装在View中,请确保View正在使用flex。这个不知道什么原理,贴出demo。 import React from 'react'; import { Text, View } from 'react-native'; import { createBottomTabNavigator, createAppContainer } from 'react-navigation'; class HomeScreen extends React.Component { render() { return ( <View style={{ flex: 1, justifyContent: 'center', alignItems: 'center' }}> <Text>Home!</Text> </View> ); } } class SettingsScreen extends React.Component { render() { return ( <View style={{ flex: 1, justifyContent: 'center', alignItems: 'center' }}> <Text>Settings!</Text> </View> ); } } const TabNavigator = createBottomTabNavigator({ Home: HomeScreen, Settings: SettingsScreen, }); const AppContainer = createAppContainer(TabNavigator); // without the style you will see a blank screen export default () =><View style={{flex: 1}}><AppContainer/></View>; react-navigation@2.14.0之前是all screens are essentially regular native View in each platform所以增加了内存的消耗 (官方原话就不翻译了,不知道platform指的是什么,是android/ios还是手机)。 react-navigation的动态路由:官方不推荐使用动态路由,React Navigation目前在静态定义路由的情况下效果最佳的。如果真的需要动态路由参考https://reactnavigation.org/docs/en/params.html 。 React-navigation在3D触控设备上不支持peek & pop功能。 注意:官方文档import Ionicons from 'react-native-vector-icons/Ionicons';替换成import Icon from 'react-native-vector-icons/Ionicons';。 高阶组件:withNavigation是一个高阶组件,它可以将navigation这个prop传递到一个包装的组件。 当你无法直接将navigation这个prop传递给组件,或者不想在深度嵌套的子组件中传递它时,它将非常有用。 屏幕进入或者推出时出发函数(比如比如停止播放视频或音频文件,或停止跟踪用户的位置。) 使用react-navigation提供的withNavigationFocus高阶组件。 使用事件监听器收听'didFocus'事件。 参考https://reactnavigation.org/docs/zh-Hans/function-after-focusing-screen.html 其他插件 React-native开发-Unrecognized font family ‘Ionicons’ 解决:https://blog.csdn.net/zhaolaoda2012/article/details/82627735 新版本的Ionicons已经替换为Icon。 import Icon from 'react-native-vector-icons/Ionicons';