搜索到
27
篇与
的结果
-
 ShardingSphere使用中的重点问题剖析 ShardingSphere使用中的重点问题剖析 一、引言 ShardingSphere是一款强大的分布式数据库中间件,在助力应用实现数据分片、读写分离等功能方面表现卓越。然而,在实际应用过程中,会遇到一些关键问题。本文将结合思维导图,深入探讨ShardingSphere在读写分离和事务处理方面的重点问题及应对策略。 二、读写分离相关问题 (一)数据库主从同步延迟问题 在读写分离架构下,主库负责写入操作,从库承担读取操作。但由于主从库之间的同步存在延迟,可能导致从库读取到的数据并非最新。 解决方案一:提供同一个线程的Ddl执行统一库。即对于在同一个线程内的一系列数据定义语言(DDL)操作,确保都在主库上执行,这样可以避免主从同步延迟带来的数据不一致问题,因为在同一线程内操作主库,能保证数据的实时性和一致性。 解决方案二:提供Hint强制读写库。通过特定的Hint机制,开发者可以在代码中明确指定某些查询操作必须在主库上执行,绕过从库,从而获取最新的数据,适用于对数据实时性要求极高的场景,如金融交易中的账户余额查询等。 (二)强制读主问题 当应用需要获取最新数据时,可能会面临强制读主的需求。但在现有的读写分离架构下,常规的基于对象关系映射(ORM)的基础增删改查(CRUD)操作可能无法直接满足这一要求。 解决方法:需要重构ORM封装的基础CRUD。通过对ORM框架进行定制化开发或扩展,使其能够支持根据业务需求灵活选择从主库还是从库进行读取操作。例如,在特定的业务方法中,通过修改ORM的查询逻辑,添加强制读主的标识,让查询直接路由到主库,保证数据的及时性。 (三)Sql兼容问题 在使用ShardingSphere进行读写分离时,部分SQL语句可能会出现兼容性问题。 部分Sql语句不支持,需要换语句:例如“Select Distinct Test_Int From T_Order;”这样的语句可能无法直接在ShardingSphere环境下正常执行。此时,开发者需要根据ShardingSphere的语法和规则,对SQL语句进行改写,以满足数据库的操作要求。 Union(合并)相关语句示例:像“Select User_Id, Order_Id, Status From T_Order Union All Select Item_Id, Order_Id, User_Id From T_Order_Item”这样的Union操作语句,在使用时也需要注意其在ShardingSphere中的兼容性。可能需要对表结构、字段类型等进行进一步的检查和调整,确保Union操作能够正确执行,实现数据的合并查询需求。 三、事务问题 (一)Sharding-Jdbc不支持强事务 Sharding-Jdbc作为ShardingSphere的一种使用模式,在事务处理方面存在一定局限性,它不支持传统的强事务(如严格的ACID事务)。 解决策略一:尽量在业务处理事务。在应用层的业务逻辑中,通过合理的流程设计和代码编写,将相关的操作进行分组和协调,以满足业务对数据一致性的要求。例如,在电商系统的下单流程中,通过在业务代码中依次处理库存扣减、订单生成等操作,并进行异常捕获和回滚处理,来模拟事务的一致性效果。 解决策略二:使用Sharding-Proxy,支持多种分布式事务。Sharding-Proxy提供了对分布式事务更好的支持,它可以采用两阶段提交(2PC)、TCC(Try - Confirm - Cancel)等多种分布式事务解决方案。对于一些对事务一致性要求较高的场景,如银行转账业务,可以使用Sharding-Proxy结合合适的分布式事务方案,确保跨库操作的数据一致性。 四、总结 ShardingSphere在实现读写分离和处理事务时,虽然存在一些棘手的问题,但通过合理的技术选型和针对性的解决方案,能够有效应对。在实际项目中,开发者需要深入理解这些问题的本质和解决方案的原理,根据业务场景的特点,灵活运用相关策略,以充分发挥ShardingSphere的优势,构建高效、稳定、可靠的分布式数据库应用系统。
 -
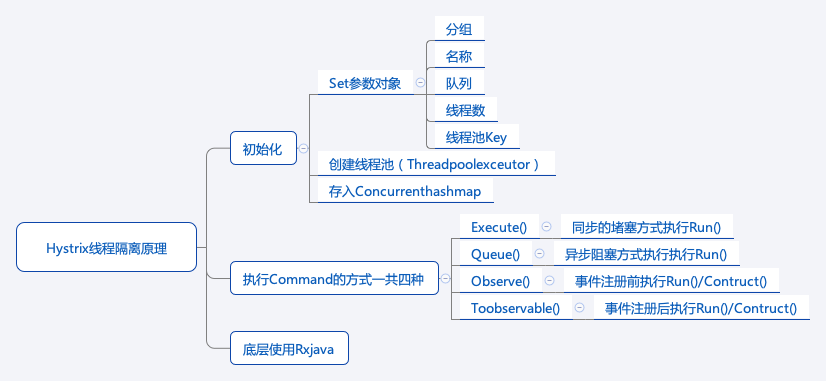
聊聊Hystrix 聊聊Hystrix 一、引言 在分布式系统中,服务之间的调用错综复杂,一个服务的故障可能会引发连锁反应,导致整个系统的雪崩效应。Hystrix作为一款强大的容错库,通过一系列机制保障系统的稳定性和可用性。本文将深入探讨Hystrix的核心原理。 二、Hystrix线程隔离原理 (一)初始化 Set参数对象:Hystrix在初始化时,需要设置一系列参数对象,包括分组(用于将相关的命令归为一组,方便资源管理和统计)、名称(标识具体的命令)、队列(用于存放待执行的任务) 、线程数(指定线程池中的线程数量,决定了能同时处理的请求量)以及线程池Key(用于唯一标识线程池)。 创建线程池(Threadpoolexcutor):根据设置的参数创建线程池,线程池是Hystrix实现线程隔离的关键组件。通过线程池,不同的服务调用可以在各自独立的线程中执行,避免了一个服务调用的阻塞影响其他调用。 存入Concurrenthashmap:将创建好的线程池存入Concurrenthashmap中,便于后续快速获取和管理。 (二)执行Command的方式 Execute():以同步的堵塞方式执行Run() 方法。这意味着调用线程会一直等待命令执行完成并返回结果,如果命令执行时间较长,调用线程会被阻塞,适用于需要立即获取结果且对响应时间要求不特别高的场景。 Queue():采用异步阻塞方式执行Run() 。它会立即返回一个Future对象,调用线程可以通过这个Future对象在后续合适的时机获取执行结果,在获取结果之前,调用线程不会被一直阻塞,适用于一些后台任务处理场景。 Observe():在事件注册前执行Run()/Construct() 。它返回一个Observable对象,通过订阅这个对象可以获取命令执行结果,并且可以在命令执行前进行一些事件注册和预处理操作。 Toobservable():在事件注册后执行Run()/Construct() 。同样返回Observable对象,不过是在事件注册之后才开始执行命令逻辑,提供了更灵活的事件处理和结果订阅机制。 (三)底层使用Rxjava Hystrix的底层实现依赖于Rxjava,Rxjava是一个基于事件流、实现异步操作的库。它提供了丰富的操作符来处理异步任务、事件流的组合和转换等。在Hystrix中,利用Rxjava的特性可以更方便地实现异步执行、事件监听以及对命令执行结果的处理等功能,使得Hystrix的异步操作更加简洁和高效。 三、Hystrix的其他关键机制 (一)熔断器(Circuit Breaker) 熔断器就像一个开关,当服务调用的失败率达到一定阈值(比如在一定时间内失败率超过50% ),熔断器会被打开,后续对该服务的调用将不再实际执行,而是直接返回一个预设的 fallback 结果(比如默认值或者缓存数据)。这样可以快速失败,避免大量无效的调用,防止故障扩散。当熔断器打开一段时间后(称为休眠窗口),会尝试半开状态,允许少量请求通过,来检测服务是否已经恢复正常,如果恢复则关闭熔断器,否则继续保持打开状态。 (二)降级(Fallback) 降级是Hystrix的重要保护机制。当服务调用失败(如超时、异常等情况)或者熔断器打开时,会触发降级逻辑。开发人员可以自定义fallback方法,返回默认值、缓存数据或者一些简单的错误提示信息等,从而保证即使在服务不可用的情况下,系统仍能给用户提供一定的响应,而不是直接报错,提升了用户体验和系统的稳定性。 (三)请求缓存(Request Caching) Hystrix支持请求缓存功能,在一次请求过程中,如果相同的命令被多次调用,Hystrix可以从缓存中直接获取结果,而不需要重新执行命令。这在一些频繁调用相同服务且结果相对稳定的场景下,可以大大减少不必要的服务调用,提高系统的响应速度和性能。 四、总结 Hystrix通过线程隔离、熔断器、降级、请求缓存等一系列精心设计的原理和机制,为分布式系统构建了强大的容错体系。理解这些原理,有助于我们在实际开发中合理配置和使用Hystrix,提升系统的健壮性和可靠性,更好地应对复杂多变的分布式环境中的各种故障和挑战。 五 实操 1. 引入依赖 在pom.xml文件中添加相关依赖: <dependency> <groupId>org.springframework.cloud</groupId> <artifactId>spring - cloud - starter - hystrix</artifactId> </dependency> <dependency> <groupId>org.springframework.boot</groupId> <artifactId>spring - boot - starter - web</artifactId> </dependency> 2. 启用Hystrix 在Spring Boot应用的主类上添加@EnableHystrix注解来启用Hystrix: import org.springframework.boot.SpringApplication; import org.springframework.boot.autoconfigure.SpringBootApplication; import org.springframework.cloud.netflix.hystrix.EnableHystrix; @SpringBootApplication @EnableHystrix public class HystrixApplication { public static void main(String[] args) { SpringApplication.run(HystrixApplication.class, args); } } 3. 线程隔离与命令执行示例 创建一个服务类,定义一个使用HystrixCommand的方法: import com.netflix.hystrix.HystrixCommand; import com.netflix.hystrix.HystrixCommandGroupKey; import com.netflix.hystrix.HystrixCommandProperties; public class HelloWorldHystrixCommand extends HystrixCommand<String> { private final String name; public HelloWorldHystrixCommand(String name) { super(Setter.withGroupKey(HystrixCommandGroupKey.Factory.asKey("ExampleGroup")) .andCommandPropertiesDefaults( HystrixCommandProperties.Setter() .withExecutionTimeoutInMilliseconds(5000) // 设置执行超时时间 )); this.name = name; } @Override protected String run() { // 模拟实际的服务调用,这里简单返回问候语 return "Hello, " + name + "!"; } @Override protected String getFallback() { // 降级逻辑,当run方法执行失败时调用 return "Sorry, something went wrong while greeting you, " + name + "!"; } } 使用这个命令类: public class Main { public static void main(String[] args) { HelloWorldHystrixCommand command = new HelloWorldHystrixCommand("John"); // 同步执行方式 String result = command.execute(); System.out.println(result); // 异步执行方式 command.queue(); } } 4. 基于Spring Boot和注解的Hystrix使用 创建一个服务接口和实现类: import org.springframework.stereotype.Service; @Service public class HelloService { @com.netflix.hystrix.contrib.javanica.annotation.HystrixCommand(fallbackMethod = "fallbackHello") public String sayHello(String name) { // 模拟可能失败的服务调用,比如网络延迟或异常 if (Math.random() < 0.2) { // 20%的概率模拟失败 throw new RuntimeException("Service error"); } return "Hello, " + name + "!"; } public String fallbackHello(String name) { return "Sorry, can't say hello right now, " + name + "!"; } } 创建一个控制器类来调用服务: import org.springframework.beans.factory.annotation.Autowired; import org.springframework.web.bind.annotation.GetMapping; import org.springframework.web.bind.annotation.RequestParam; import org.springframework.web.bind.annotation.RestController; @RestController public class HelloController { @Autowired private HelloService helloService; @GetMapping("/hello") public String hello(@RequestParam String name) { return helloService.sayHello(name); } } 以上代码分别展示了Hystrix基本命令的使用方式,包括线程隔离下的命令执行以及基于Spring Boot和注解的服务熔断降级功能。实际应用中,可根据业务需求进一步调整配置和逻辑 。
-
Spring Security OAuth2在微前端架构下实现统一退出 Spring Security OAuth2在微前端架构下实现统一退出 在微前端架构中,当一个应用退出登录时,实现所有应用同步退出的功能是一个常见需求。这个问题主要源于微前端架构下各个子应用之间的分离特性,导致一个应用注销后,其他应用仍保持登录状态。下面我将详细介绍如何解决这个问题。 问题分析 微前端架构下,登出问题主要有以下几个原因: 各子应用可能使用独立的会话管理 OAuth2 token可能在各应用中独立存储 缺乏统一的退出机制来协调各个子应用 解决方案 1. 实现单点登出(Single Sign-Out) @RestController public class LogoutController { private final TokenStore tokenStore; private final ClientRegistrationRepository clientRegistrationRepository; public LogoutController(TokenStore tokenStore, ClientRegistrationRepository clientRegistrationRepository) { this.tokenStore = tokenStore; this.clientRegistrationRepository = clientRegistrationRepository; } @PostMapping("/api/logout") public ResponseEntity<Map<String, String>> logout( @RequestParam(value = "token", required = false) String token, HttpServletRequest request, HttpServletResponse response, @AuthenticationPrincipal OAuth2User principal) { // 获取当前认证信息 Authentication auth = SecurityContextHolder.getContext().getAuthentication(); // 如果存在认证信息,则进行处理 if (auth != null) { // 撤销token if (auth instanceof OAuth2AuthenticationToken) { OAuth2AuthenticationToken oauthToken = (OAuth2AuthenticationToken) auth; String clientRegistrationId = oauthToken.getAuthorizedClientRegistrationId(); // 根据需要调用OAuth2服务器的撤销接口 revokeToken(clientRegistrationId, token); } // 清除安全上下文 SecurityContextHolder.clearContext(); // 使session失效 HttpSession session = request.getSession(false); if (session != null) { session.invalidate(); } // 清除相关cookie deleteCookies(request, response); } Map<String, String> result = new HashMap<>(); result.put("message", "成功退出登录"); return ResponseEntity.ok(result); } private void revokeToken(String clientRegistrationId, String token) { try { ClientRegistration clientRegistration = clientRegistrationRepository.findByRegistrationId(clientRegistrationId); if (clientRegistration != null && token != null) { // 根据OAuth2服务器提供的撤销端点进行token撤销 String revokeEndpoint = clientRegistration.getProviderDetails().getConfigurationMetadata().get("revocation_endpoint").toString(); RestTemplate restTemplate = new RestTemplate(); HttpHeaders headers = new HttpHeaders(); headers.setContentType(MediaType.APPLICATION_FORM_URLENCODED); MultiValueMap<String, String> map = new LinkedMultiValueMap<>(); map.add("token", token); map.add("client_id", clientRegistration.getClientId()); map.add("client_secret", clientRegistration.getClientSecret()); HttpEntity<MultiValueMap<String, String>> request = new HttpEntity<>(map, headers); restTemplate.postForEntity(revokeEndpoint, request, String.class); } } catch (Exception e) { // 处理可能的异常 logger.error("撤销token失败", e); } } private void deleteCookies(HttpServletRequest request, HttpServletResponse response) { Cookie[] cookies = request.getCookies(); if (cookies != null) { for (Cookie cookie : cookies) { // 删除认证相关的cookie if (cookie.getName().startsWith("OAUTH2_") || cookie.getName().equals("JSESSIONID") || cookie.getName().equals("SESSION")) { Cookie newCookie = new Cookie(cookie.getName(), null); newCookie.setPath("/"); newCookie.setMaxAge(0); newCookie.setHttpOnly(true); response.addCookie(newCookie); } } } } } 2. 创建统一的登出前端服务 // auth-service.js export class AuthService { constructor() { this.logoutListeners = []; this.setupLogoutListener(); } // 添加登出监听器 addLogoutListener(callback) { this.logoutListeners.push(callback); return () => { this.logoutListeners = this.logoutListeners.filter(cb => cb !== callback); }; } // 发送登出事件到所有注册的应用 notifyLogout() { // 通过BroadcastChannel发送消息 const bc = new BroadcastChannel('auth-logout-channel'); bc.postMessage({ type: 'LOGOUT' }); bc.close(); // 同时触发监听器 this.logoutListeners.forEach(callback => callback()); } // 监听其他应用的登出事件 setupLogoutListener() { const bc = new BroadcastChannel('auth-logout-channel'); bc.onmessage = (event) => { if (event.data.type === 'LOGOUT') { // 执行本地登出操作 this.logout(false); // 不广播,避免循环 } }; } // 登出方法 async logout(broadcast = true) { try { // 调用后端登出API const response = await fetch('/api/logout', { method: 'POST', credentials: 'include', headers: { 'Content-Type': 'application/json' } }); if (response.ok) { // 清除本地存储 localStorage.removeItem('oauth2_token'); sessionStorage.removeItem('oauth2_token'); // 清除相关cookie this.clearAuthCookies(); // 通知其他应用 if (broadcast) { this.notifyLogout(); } return true; } else { console.error('登出失败:', await response.text()); return false; } } catch (error) { console.error('登出过程中发生错误:', error); return false; } } // 清除认证相关cookie clearAuthCookies() { const cookies = document.cookie.split(';'); for (let i = 0; i < cookies.length; i++) { const cookie = cookies[i]; const eqPos = cookie.indexOf('='); const name = eqPos > -1 ? cookie.substring(0, eqPos).trim() : cookie.trim(); if (name.startsWith('OAUTH2_') || name === 'JSESSIONID' || name === 'SESSION') { document.cookie = `${name}=;path=/;expires=Thu, 01 Jan 1970 00:00:00 GMT`; } } } // 检查是否已登录 isAuthenticated() { // 根据实际存储方式检查认证状态 return localStorage.getItem('oauth2_token') !== null || sessionStorage.getItem('oauth2_token') !== null; } } // 导出单例 export const authService = new AuthService(); 3. 创建主应用的登出组件 // LogoutButton.jsx (React组件示例) import React from 'react'; import { authService } from './auth-service'; const LogoutButton = () => { const handleLogout = async () => { const success = await authService.logout(); if (success) { // 重定向到登录页或首页 window.location.href = '/login'; } else { alert('登出失败,请重试'); } }; return ( <button className="logout-button" onClick={handleLogout} > 退出登录 </button> ); }; export default LogoutButton; 4. 为各个微前端应用添加登出监听 // 在每个子应用的入口文件中添加 import { authService } from 'shared-lib/auth-service'; class MicroApp { constructor() { this.init(); } init() { // 注册登出监听器 this.unsubscribeLogout = authService.addLogoutListener(() => { // 当收到登出事件时,清理本地状态 this.handleLogout(); }); // 监听卸载事件,移除监听器 window.addEventListener('unload', () => { if (this.unsubscribeLogout) { this.unsubscribeLogout(); } }); // 设置全局登出处理方法 window.microAppLogout = () => { authService.logout(); }; } handleLogout() { // 清理本地存储 localStorage.removeItem('app_state'); sessionStorage.removeItem('app_state'); // 重置应用状态 this.resetAppState(); // 可选:重定向到登录页 window.location.href = '/login'; } resetAppState() { // 重置应用状态逻辑 // ... } } // 初始化应用 const app = new MicroApp(); 5. 使用Redis实现会话共享 为了确保后端会话的统一管理,应使用Redis存储会话: @Configuration @EnableRedisHttpSession public class RedisSessionConfig { @Bean public RedisTemplate<String, Object> redisTemplate(RedisConnectionFactory connectionFactory) { RedisTemplate<String, Object> template = new RedisTemplate<>(); template.setConnectionFactory(connectionFactory); // 使用Jackson2为序列化和反序列化 Jackson2JsonRedisSerializer<Object> serializer = new Jackson2JsonRedisSerializer<>(Object.class); ObjectMapper mapper = new ObjectMapper(); mapper.setVisibility(PropertyAccessor.ALL, JsonAutoDetect.Visibility.ANY); mapper.activateDefaultTyping( LaissezFaireSubTypeValidator.instance, ObjectMapper.DefaultTyping.NON_FINAL, JsonTypeInfo.As.PROPERTY ); serializer.setObjectMapper(mapper); template.setKeySerializer(new StringRedisSerializer()); template.setValueSerializer(serializer); template.setHashKeySerializer(new StringRedisSerializer()); template.setHashValueSerializer(serializer); template.afterPropertiesSet(); return template; } @Bean public HttpSessionIdResolver httpSessionIdResolver() { // 使用Cookie和Header双重策略,提高灵活性 return new CookieAndHeaderHttpSessionIdResolver(); } } // 自定义会话ID解析器,支持Cookie和Header class CookieAndHeaderHttpSessionIdResolver implements HttpSessionIdResolver { private static final String HEADER_NAME = "X-Auth-Token"; private final CookieHttpSessionIdResolver cookieResolver = new CookieHttpSessionIdResolver(); private final HeaderHttpSessionIdResolver headerResolver = HeaderHttpSessionIdResolver.xAuthToken(); @Override public List<String> resolveSessionIds(HttpServletRequest request) { List<String> sessionIds = cookieResolver.resolveSessionIds(request); if (sessionIds.isEmpty()) { sessionIds = headerResolver.resolveSessionIds(request); } return sessionIds; } @Override public void setSessionId(HttpServletRequest request, HttpServletResponse response, String sessionId) { cookieResolver.setSessionId(request, response, sessionId); headerResolver.setSessionId(request, response, sessionId); } @Override public void expireSession(HttpServletRequest request, HttpServletResponse response) { cookieResolver.expireSession(request, response); headerResolver.expireSession(request, response); } } 6. 实现OAuth2统一退出端点 为了完全支持OAuth2退出,还需要实现一个注销端点连接到OAuth2服务器: @Configuration public class OAuth2LogoutConfig { private final ClientRegistrationRepository clientRegistrationRepository; public OAuth2LogoutConfig(ClientRegistrationRepository clientRegistrationRepository) { this.clientRegistrationRepository = clientRegistrationRepository; } @Bean public SecurityFilterChain securityFilterChain(HttpSecurity http) throws Exception { http .authorizeHttpRequests(authorize -> authorize .requestMatchers("/api/public/**", "/login", "/oauth2/authorization/**").permitAll() .anyRequest().authenticated() ) .oauth2Login(oauth2 -> oauth2 .loginPage("/login") .defaultSuccessUrl("/dashboard") ) .logout(logout -> logout .logoutUrl("/api/logout") .logoutSuccessHandler(this.oidcLogoutSuccessHandler()) .invalidateHttpSession(true) .clearAuthentication(true) .deleteCookies("JSESSIONID", "SESSION") ); return http.build(); } private LogoutSuccessHandler oidcLogoutSuccessHandler() { OidcClientInitiatedLogoutSuccessHandler oidcLogoutSuccessHandler = new OidcClientInitiatedLogoutSuccessHandler(this.clientRegistrationRepository); // 设置退出后的重定向URL oidcLogoutSuccessHandler.setPostLogoutRedirectUri("{baseUrl}/login?logout=success"); return (request, response, authentication) -> { // 获取会话中的信息用于撤销token等操作 HttpSession session = request.getSession(false); if (session != null) { String idToken = (String) session.getAttribute("id_token"); if (idToken != null && authentication instanceof OAuth2AuthenticationToken) { OAuth2AuthenticationToken oauthToken = (OAuth2AuthenticationToken) authentication; ClientRegistration clientRegistration = this.clientRegistrationRepository .findByRegistrationId(oauthToken.getAuthorizedClientRegistrationId()); // 尝试撤销令牌 try { revokeTokens(clientRegistration, request); } catch (Exception e) { // 记录错误但继续退出流程 e.printStackTrace(); } } } // 调用OIDC退出处理器 oidcLogoutSuccessHandler.onLogoutSuccess(request, response, authentication); }; } private void revokeTokens(ClientRegistration clientRegistration, HttpServletRequest request) { // 实现令牌撤销逻辑 HttpSession session = request.getSession(false); if (session != null && clientRegistration != null) { String accessToken = (String) session.getAttribute("access_token"); String refreshToken = (String) session.getAttribute("refresh_token"); if (accessToken != null || refreshToken != null) { // 检查是否有撤销端点配置 Object revocationUri = clientRegistration.getProviderDetails() .getConfigurationMetadata().get("revocation_endpoint"); if (revocationUri != null) { RestTemplate restTemplate = new RestTemplate(); HttpHeaders headers = new HttpHeaders(); headers.setContentType(MediaType.APPLICATION_FORM_URLENCODED); headers.setBasicAuth(clientRegistration.getClientId(), clientRegistration.getClientSecret()); // 撤销访问令牌 if (accessToken != null) { MultiValueMap<String, String> body = new LinkedMultiValueMap<>(); body.add("token", accessToken); body.add("token_type_hint", "access_token"); HttpEntity<MultiValueMap<String, String>> entity = new HttpEntity<>(body, headers); restTemplate.postForEntity(revocationUri.toString(), entity, String.class); } // 撤销刷新令牌 if (refreshToken != null) { MultiValueMap<String, String> body = new LinkedMultiValueMap<>(); body.add("token", refreshToken); body.add("token_type_hint", "refresh_token"); HttpEntity<MultiValueMap<String, String>> entity = new HttpEntity<>(body, headers); restTemplate.postForEntity(revocationUri.toString(), entity, String.class); } } } } } } 实现要点解析 统一后端登出端点 清除服务器端会话 撤销OAuth2令牌 删除相关Cookie 通知OAuth2授权服务器 前端统一登出机制 使用BroadcastChannel进行跨应用通信 共享认证服务实现登出状态同步 提供全局登出方法 使用Redis共享会话 确保所有后端服务访问相同的会话存储 支持会话的快速失效 前端存储清理 清除localStorage和sessionStorage中的认证信息 删除认证相关Cookie 最佳实践 使用OpenID Connect(OIDC)标准 利用OIDC的标准登出流程 实现前后端退出的协调 使用统一的会话ID 为所有微前端应用使用相同的会话标识 避免使用多种会话管理方式 实现健壮的错误处理 当部分退出流程失败时仍能完成整体退出 提供清晰的用户反馈 安全考虑 确保退出端点的安全访问 防止CSRF攻击 结论 通过上述方案的实现,可以确保微前端架构下的统一退出机制,使得用户在任一子应用退出后,所有应用都同步退出登录状态。这种方案既保证了用户体验的一致性,也提高了系统的安全性,避免了部分应用仍保持登录状态可能带来的安全风险。 刚好再学react,就用react写前端了
-
larvel 实现注册eureka larvel 实现注册eureka 项目需要,php部分功能作为微服务注册到eureka 如下实现 <?php namespace App\Services; use GuzzleHttp\Client; use GuzzleHttp\Exception\GuzzleException; use Illuminate\Support\Facades\Log; use Illuminate\Support\Facades\Cache; class EurekaService { protected $client; protected $config; protected $instanceId; protected $appName; protected $ipAddress; protected $port; protected $vipAddress; protected $heartbeatInterval; protected $eurekaUrl; protected $renewalTimer; /** * EurekaService 构造函数 */ public function __construct() { $this->client = new Client(); $this->loadConfig(); $this->setupInstance(); } /** * 从Laravel配置文件加载配置 */ protected function loadConfig() { $this->config = config('eureka'); $this->eurekaUrl = $this->config['eureka_url']; $this->appName = $this->config['app_name']; $this->ipAddress = $this->config['ip_address'] ?? gethostbyname(gethostname()); $this->port = $this->config['port'] ?? 80; $this->vipAddress = $this->config['vip_address'] ?? $this->appName; $this->heartbeatInterval = $this->config['heartbeat_interval'] ?? 30; $this->instanceId = $this->appName . ':' . $this->ipAddress . ':' . $this->port; } /** * 设置实例详细信息 */ protected function setupInstance() { // 默认实例数据 $this->instanceData = [ 'instance' => [ 'instanceId' => $this->instanceId, 'hostName' => $this->ipAddress, 'app' => strtoupper($this->appName), 'ipAddr' => $this->ipAddress, 'status' => 'UP', 'port' => [ '$' => $this->port, '@enabled' => 'true', ], 'securePort' => [ '$' => 443, '@enabled' => 'false', ], 'homePageUrl' => "http://{$this->ipAddress}:{$this->port}/", 'statusPageUrl' => "http://{$this->ipAddress}:{$this->port}/info", 'healthCheckUrl' => "http://{$this->ipAddress}:{$this->port}/health", 'dataCenterInfo' => [ '@class' => 'com.netflix.appinfo.InstanceInfo$DefaultDataCenterInfo', 'name' => 'MyOwn', ], 'leaseInfo' => [ 'renewalIntervalInSecs' => 30, 'durationInSecs' => 90, 'registrationTimestamp' => 0, 'lastRenewalTimestamp' => 0, 'evictionTimestamp' => 0, 'serviceUpTimestamp' => 0, ], 'metadata' => [ '@class' => 'java.util.Collections$EmptyMap', 'management.port' => (string)$this->port, ], 'vipAddress' => $this->vipAddress, 'secureVipAddress' => $this->vipAddress, 'isCoordinatingDiscoveryServer' => 'false', 'lastUpdatedTimestamp' => (string)(time() * 1000), 'lastDirtyTimestamp' => (string)(time() * 1000), 'actionType' => 'ADDED', ] ]; } /** * 向Eureka服务器注册应用 * * @return bool */ public function register() { try { $response = $this->client->request( 'POST', "{$this->eurekaUrl}/apps/{$this->appName}", [ 'headers' => [ 'Content-Type' => 'application/json', 'Accept' => 'application/json' ], 'json' => $this->instanceData ] ); if ($response->getStatusCode() === 204) { Log::info("成功将服务 {$this->appName} 注册到Eureka"); $this->startHeartbeat(); return true; } Log::error("向Eureka注册失败。状态码: " . $response->getStatusCode()); return false; } catch (GuzzleException $e) { Log::error("Eureka注册错误: " . $e->getMessage()); return false; } } /** * 启动心跳进程以保持注册活跃 */ protected function startHeartbeat() { // 存储缓存值以跟踪心跳是否活跃 Cache::put('eureka_heartbeat_active', true, now()->addDay()); // 在生产环境中,您可能希望使用更可靠的方法 // 如计划任务或队列工作器来处理心跳 $this->scheduleNextHeartbeat(); } /** * 安排下一次心跳 */ protected function scheduleNextHeartbeat() { // 这是一个简化的演示方法 // 在实际应用中,您应该使用Laravel的任务调度器或队列工作器 dispatch(function () { if (Cache::get('eureka_heartbeat_active', false)) { $this->sendHeartbeat(); $this->scheduleNextHeartbeat(); } })->delay(now()->addSeconds($this->heartbeatInterval)); } /** * 向Eureka发送心跳 * * @return bool */ public function sendHeartbeat() { try { $response = $this->client->request( 'PUT', "{$this->eurekaUrl}/apps/{$this->appName}/{$this->instanceId}", [ 'headers' => [ 'Content-Type' => 'application/json', 'Accept' => 'application/json' ] ] ); if ($response->getStatusCode() === 200) { Log::debug("已向Eureka发送 {$this->appName} 的心跳"); return true; } Log::warning("向Eureka发送心跳失败。状态码: " . $response->getStatusCode()); return false; } catch (GuzzleException $e) { Log::error("Eureka心跳错误: " . $e->getMessage()); return false; } } /** * 从Eureka服务器注销 * * @return bool */ public function deregister() { try { // 首先停止心跳 Cache::forget('eureka_heartbeat_active'); $response = $this->client->request( 'DELETE', "{$this->eurekaUrl}/apps/{$this->appName}/{$this->instanceId}" ); if ($response->getStatusCode() === 200) { Log::info("成功从Eureka注销服务 {$this->appName}"); return true; } Log::error("从Eureka注销失败。状态码: " . $response->getStatusCode()); return false; } catch (GuzzleException $e) { Log::error("Eureka注销错误: " . $e->getMessage()); return false; } } /** * 从Eureka获取所有服务 * * @return array|null */ public function getAllServices() { try { $response = $this->client->request( 'GET', "{$this->eurekaUrl}/apps", [ 'headers' => [ 'Accept' => 'application/json' ] ] ); if ($response->getStatusCode() === 200) { return json_decode($response->getBody()->getContents(), true); } Log::error("从Eureka获取服务失败。状态码: " . $response->getStatusCode()); return null; } catch (GuzzleException $e) { Log::error("从Eureka获取服务时出错: " . $e->getMessage()); return null; } } /** * 通过应用名称获取特定服务 * * @param string $appName * @return array|null */ public function getServiceByName($appName) { try { $response = $this->client->request( 'GET', "{$this->eurekaUrl}/apps/{$appName}", [ 'headers' => [ 'Accept' => 'application/json' ] ] ); if ($response->getStatusCode() === 200) { return json_decode($response->getBody()->getContents(), true); } Log::error("从Eureka获取服务 {$appName} 失败。状态码: " . $response->getStatusCode()); return null; } catch (GuzzleException $e) { Log::error("从Eureka获取服务 {$appName} 时出错: " . $e->getMessage()); return null; } } } <?php return [ /* |-------------------------------------------------------------------------- | Eureka 连接设置 |-------------------------------------------------------------------------- | | 配置连接到Eureka服务发现服务器的设置。 | */ // Eureka服务器URL 'eureka_url' => env('EUREKA_URL', 'http://localhost:8761/eureka'), // 您的应用名称(用于服务注册) 'app_name' => env('EUREKA_APP_NAME', 'laravel-service'), // 实例IP地址(如果未指定,默认为服务器IP) 'ip_address' => env('EUREKA_IP_ADDRESS', null), // 服务运行的端口 'port' => env('EUREKA_PORT', 80), // VIP地址(用于负载均衡的虚拟IP,如果未指定,默认为app_name) 'vip_address' => env('EUREKA_VIP_ADDRESS', null), // 心跳间隔(秒) 'heartbeat_interval' => env('EUREKA_HEARTBEAT_INTERVAL', 30), // 关于此实例的元数据(可选) 'metadata' => [ 'management.port' => env('EUREKA_MANAGEMENT_PORT', 80), 'environment' => env('APP_ENV', 'production'), ], ]; <?php namespace App\Providers; use App\Services\EurekaService; use Illuminate\Support\ServiceProvider; class EurekaServiceProvider extends ServiceProvider { /** * 注册服务 * * @return void */ public function register() { $this->mergeConfigFrom( __DIR__ . '/../../config/eureka.php', 'eureka' ); $this->app->singleton(EurekaService::class, function ($app) { return new EurekaService(); }); } /** * 引导服务 * * @return void */ public function boot() { $this->publishes([ __DIR__ . '/../../config/eureka.php' => config_path('eureka.php'), ], 'config'); // 仅在启用Eureka且不在控制台运行时注册 if (config('eureka.enabled', true) && !$this->app->runningInConsole()) { $eureka = $this->app->make(EurekaService::class); $eureka->register(); // 注册关闭函数,在应用程序关闭时注销 register_shutdown_function(function () use ($eureka) { $eureka->deregister(); }); } } } <?php namespace App\Http\Controllers; use Illuminate\Http\Request; use Illuminate\Support\Facades\DB; class HealthController extends Controller { /** * 返回应用程序健康状态 * * @return \Illuminate\Http\JsonResponse */ public function health() { $status = 'UP'; $components = []; // 检查数据库连接 try { DB::connection()->getPdo(); $components['database'] = [ 'status' => 'UP', 'type' => 'db', 'details' => [ 'database' => config('database.default'), ] ]; } catch (\Exception $e) { $status = 'DOWN'; $components['database'] = [ 'status' => 'DOWN', 'type' => 'db', 'details' => [ 'error' => $e->getMessage(), ] ]; } // 检查磁盘空间 $diskFree = disk_free_space('/'); $diskTotal = disk_total_space('/'); $diskThreshold = 0.1; // 10%空闲空间阈值 $diskStatus = ($diskFree / $diskTotal > $diskThreshold) ? 'UP' : 'DOWN'; if ($diskStatus === 'DOWN') { $status = 'DOWN'; } $components['diskSpace'] = [ 'status' => $diskStatus, 'details' => [ 'total' => $diskTotal, 'free' => $diskFree, 'threshold' => $diskThreshold, ] ]; return response()->json([ 'status' => $status, 'components' => $components, ]); } /** * 返回应用程序信息 * * @return \Illuminate\Http\JsonResponse */ public function info() { return response()->json([ 'app' => [ 'name' => config('app.name'), 'version' => config('app.version', '1.0.0'), 'environment' => config('app.env'), 'laravel' => app()->version(), ], ]); } } Laravel Eureka集成指南 本指南将帮助您将Laravel应用程序与Netflix的Eureka服务发现系统集成。此集成允许您的Laravel应用向Eureka注册,维持心跳,并发现其他服务。 1. 设置配置 首先,为Eureka创建一个新的配置文件: php artisan vendor:publish --provider="App\Providers\EurekaServiceProvider" --tag="config" 如果发布命令不起作用(因为我们尚未注册提供者),请手动创建配置文件: mkdir -p config 然后将eureka.php配置文件放在Laravel项目的config目录中。 2. 配置环境变量 将这些变量添加到您的.env文件中: EUREKA_URL=http://your-eureka-server:8761/eureka EUREKA_APP_NAME=your-service-name EUREKA_PORT=80 EUREKA_IP_ADDRESS=your-service-ip 3. 创建所需文件 按如下方式创建必要的服务和提供者文件: 首先,创建EurekaService类: mkdir -p app/Services 然后将EurekaService.php文件复制到此目录。 创建服务提供者: mkdir -p app/Providers 然后将EurekaServiceProvider.php文件复制到此目录。 创建用于Eureka健康检查的控制器: mkdir -p app/Http/Controllers 然后将HealthController.php文件复制到此目录。 4. 注册服务提供者 将Eureka服务提供者添加到config/app.php文件的providers数组中: 'providers' => [ // 其他提供者... App\Providers\EurekaServiceProvider::class, ], 5. 添加健康检查路由 将这些路由添加到您的routes/api.php文件中: Route::get('/health', [App\Http\Controllers\HealthController::class, 'health']); Route::get('/info', [App\Http\Controllers\HealthController::class, 'info']); 6. 测试集成 您可以通过以下方式测试您的Laravel应用程序是否成功注册到Eureka: 启动您的Laravel应用程序: php artisan serve 检查Eureka仪表板(通常在http://your-eureka-server:8761) 在已注册应用程序列表中查找您的服务 7. 使用服务发现 现在您可以使用EurekaService来发现其他服务: $eurekaService = app(App\Services\EurekaService::class); // 获取所有已注册服务的信息 $allServices = $eurekaService->getAllServices(); // 获取特定服务的信息 $userService = $eurekaService->getServiceByName('USER-SERVICE'); 8. 故障排除 如果遇到问题: 检查Laravel日志:storage/logs/laravel.log 验证Eureka服务器是否正在运行并可访问 检查您的Laravel应用和Eureka之间的网络连接 确保您应用的IP地址设置正确 9. 额外配置 对于生产用途,请考虑: 设置计划任务以实现更可靠的心跳: // 在 App\Console\Kernel.php 中 protected function schedule(Schedule $schedule) { $schedule->call(function () { app(App\Services\EurekaService::class)->sendHeartbeat(); })->everyThirtySeconds(); } 在选择服务实例时添加负载均衡逻辑 为服务调用实现断路器 <?php // routes/api.php use App\Http\Controllers\HealthController; use Illuminate\Support\Facades\Route; // Eureka健康检查端点 Route::get('/health', [HealthController::class, 'health']); Route::get('/info', [HealthController::class, 'info']); // 示例:创建使用其他Eureka服务的路由 Route::get('/service-example', function() { $eurekaService = app(\App\Services\EurekaService::class); // 示例:获取服务信息 $serviceInfo = $eurekaService->getServiceByName('EXAMPLE-SERVICE'); if (!$serviceInfo) { return response()->json(['error' => '未找到服务'], 404); } // 提取实例详细信息(简化示例) $instance = $serviceInfo['application']['instance'][0] ?? null; if (!$instance) { return response()->json(['error' => '没有可用实例'], 503); } $serviceUrl = "http://{$instance['ipAddr']}:{$instance['port']['$']}/api/endpoint"; // 在这里,您可以使用Guzzle或其他HTTP客户端调用服务 // $client = new \GuzzleHttp\Client(); // $response = $client->get($serviceUrl); return response()->json([ 'message' => '服务已发现', 'serviceUrl' => $serviceUrl ]); }); 我已经为Laravel应用程序实现了Eureka服务注册功能,并按要求将所有代码注释和说明改为中文。以下是实现方案的主要组件和使用方法: 主要组件 EurekaService 服务类 处理与Eureka服务器的所有交互 提供注册、心跳、注销和服务发现功能 配置文件 包含Eureka连接和注册所需的所有配置选项 支持通过环境变量自定义配置 服务提供者 注册EurekaService到Laravel容器 处理应用启动时的服务注册和关闭时的注销 健康检查控制器 提供健康检查和应用信息端点 符合Eureka的健康检查要求 路由配置 包含健康检查和服务发现示例的路由 安装指南 详细说明如何在Laravel项目中设置和配置Eureka集成 使用方法 将所有文件复制到相应的Laravel项目目录中 在.env文件中配置Eureka连接信息 注册服务提供者 启动应用程序,
-
Spring Security OAuth2与Spring Session Redis整合实现微服务会话共享 Spring Security OAuth2与Spring Session Redis整合实现微服务会话共享 引言 在微服务架构中,会话管理是一个常见的挑战。当用户通过OAuth2认证后,如何在多个微服务之间共享会话信息成为一个亟待解决的问题。本文将详细介绍如何利用Spring Security OAuth2结合Spring Session Redis实现微服务架构下的会话共享方案。 技术栈 Spring Boot Spring Security OAuth2 Spring Session Redis Spring Cloud (可选,用于服务发现等) 为什么选择Redis作为会话存储 在分布式系统中,使用Redis存储会话有以下优势: 高性能:Redis是基于内存的数据库,读写速度极快 数据持久化:支持数据持久化,防止数据丢失 丰富的数据结构:支持多种数据类型,适合存储复杂的会话数据 原生的过期机制:便于管理会话生命周期 实现步骤 1. 添加依赖 首先,我们需要在各个微服务的pom.xml文件中添加必要的依赖: <dependencies> <!-- Spring Boot 依赖 --> <dependency> <groupId>org.springframework.boot</groupId> <artifactId>spring-boot-starter-web</artifactId> </dependency> <!-- Spring Security OAuth2 依赖 --> <dependency> <groupId>org.springframework.boot</groupId> <artifactId>spring-boot-starter-oauth2-client</artifactId> </dependency> <dependency> <groupId>org.springframework.boot</groupId> <artifactId>spring-boot-starter-oauth2-resource-server</artifactId> </dependency> <!-- Spring Session Redis 依赖 --> <dependency> <groupId>org.springframework.boot</groupId> <artifactId>spring-boot-starter-data-redis</artifactId> </dependency> <dependency> <groupId>org.springframework.session</groupId> <artifactId>spring-session-data-redis</artifactId> </dependency> </dependencies> 2. 配置Redis与Spring Session 在每个微服务的application.yml文件中添加Redis和Spring Session的配置: spring: redis: host: localhost port: 6379 password: # 如有密码则填写 database: 0 session: store-type: redis redis: namespace: spring:session # Redis中存储会话的命名空间前缀 timeout: 1800 # 会话超时时间(秒) security: oauth2: client: registration: custom-client: client-id: client-id client-secret: client-secret authorization-grant-type: authorization_code redirect-uri: "{baseUrl}/login/oauth2/code/{registrationId}" scope: read,write provider: custom-provider: authorization-uri: http://auth-server/oauth/authorize token-uri: http://auth-server/oauth/token user-info-uri: http://auth-server/userinfo user-name-attribute: name server: servlet: session: cookie: http-only: true secure: true # 在生产环境中应设置为true 3. 启用Spring Session 在主应用类上添加@EnableRedisHttpSession注解: package com.example.microservice; import org.springframework.boot.SpringApplication; import org.springframework.boot.autoconfigure.SpringBootApplication; import org.springframework.session.data.redis.config.annotation.web.http.EnableRedisHttpSession; @SpringBootApplication @EnableRedisHttpSession public class MicroserviceApplication { public static void main(String[] args) { SpringApplication.run(MicroserviceApplication.class, args); } } 4. 配置Spring Security OAuth2 创建Security配置类,配置OAuth2认证: package com.example.microservice.config; import org.springframework.context.annotation.Bean; import org.springframework.context.annotation.Configuration; import org.springframework.security.config.annotation.web.builders.HttpSecurity; import org.springframework.security.config.annotation.web.configuration.EnableWebSecurity; import org.springframework.security.web.SecurityFilterChain; @Configuration @EnableWebSecurity public class SecurityConfig { @Bean public SecurityFilterChain securityFilterChain(HttpSecurity http) throws Exception { http .authorizeHttpRequests(authorize -> authorize .requestMatchers("/public/**").permitAll() .anyRequest().authenticated() ) .oauth2Login(oauth2 -> oauth2 .defaultSuccessUrl("/dashboard") .failureUrl("/login?error=true") ) .logout(logout -> logout .logoutSuccessUrl("/login?logout=true") .invalidateHttpSession(true) .deleteCookies("JSESSIONID") ); return http.build(); } } 5. 创建会话信息存储器 为了确保OAuth2认证信息能够在会话中正确存储和共享,创建自定义的会话信息存储器: package com.example.microservice.session; import org.springframework.security.core.Authentication; import org.springframework.security.core.context.SecurityContext; import org.springframework.security.core.context.SecurityContextHolder; import org.springframework.security.oauth2.client.authentication.OAuth2AuthenticationToken; import org.springframework.security.oauth2.core.user.OAuth2User; import org.springframework.session.Session; import org.springframework.session.SessionRepository; import org.springframework.stereotype.Component; import javax.servlet.http.HttpServletRequest; import javax.servlet.http.HttpSession; import java.util.Map; @Component public class OAuth2SessionRepository<S extends Session> { private final SessionRepository<S> sessionRepository; public OAuth2SessionRepository(SessionRepository<S> sessionRepository) { this.sessionRepository = sessionRepository; } public void saveOAuth2Authentication(HttpServletRequest request, Authentication authentication) { HttpSession session = request.getSession(false); if (session != null) { String sessionId = session.getId(); S redisSession = sessionRepository.findById(sessionId); if (redisSession != null) { if (authentication instanceof OAuth2AuthenticationToken) { OAuth2AuthenticationToken oauthToken = (OAuth2AuthenticationToken) authentication; OAuth2User oauth2User = oauthToken.getPrincipal(); // 存储用户信息和授权信息 redisSession.setAttribute("user_name", oauth2User.getAttribute("name")); redisSession.setAttribute("user_email", oauth2User.getAttribute("email")); redisSession.setAttribute("oauth2_provider", oauthToken.getAuthorizedClientRegistrationId()); // 存储OAuth2授权信息(可根据需求扩展) Map<String, Object> attributes = oauth2User.getAttributes(); for (Map.Entry<String, Object> entry : attributes.entrySet()) { if (entry.getValue() instanceof String) { redisSession.setAttribute("oauth2_attr_" + entry.getKey(), entry.getValue()); } } sessionRepository.save(redisSession); } } } } public OAuth2User getOAuth2User(String sessionId) { S redisSession = sessionRepository.findById(sessionId); if (redisSession != null) { // 根据存储的会话信息重建OAuth2User // 这里仅为示例,实际实现需要根据具体情况调整 return null; // 此处需实现具体逻辑 } return null; } } 6. 创建认证成功处理器 实现一个认证成功处理器,在用户成功认证后将OAuth2信息保存到Redis会话中: package com.example.microservice.handler; import com.example.microservice.session.OAuth2SessionRepository; import org.springframework.security.core.Authentication; import org.springframework.security.web.authentication.AuthenticationSuccessHandler; import org.springframework.stereotype.Component; import javax.servlet.ServletException; import javax.servlet.http.HttpServletRequest; import javax.servlet.http.HttpServletResponse; import java.io.IOException; @Component public class CustomAuthenticationSuccessHandler implements AuthenticationSuccessHandler { private final OAuth2SessionRepository<?> oAuth2SessionRepository; public CustomAuthenticationSuccessHandler(OAuth2SessionRepository<?> oAuth2SessionRepository) { this.oAuth2SessionRepository = oAuth2SessionRepository; } @Override public void onAuthenticationSuccess(HttpServletRequest request, HttpServletResponse response, Authentication authentication) throws IOException, ServletException { // 保存OAuth2认证信息到Redis会话 oAuth2SessionRepository.saveOAuth2Authentication(request, authentication); // 重定向到成功页面 response.sendRedirect("/dashboard"); } } 7. 更新Security配置,使用自定义认证成功处理器 package com.example.microservice.config; import com.example.microservice.handler.CustomAuthenticationSuccessHandler; import org.springframework.context.annotation.Bean; import org.springframework.context.annotation.Configuration; import org.springframework.security.config.annotation.web.builders.HttpSecurity; import org.springframework.security.config.annotation.web.configuration.EnableWebSecurity; import org.springframework.security.web.SecurityFilterChain; @Configuration @EnableWebSecurity public class SecurityConfig { private final CustomAuthenticationSuccessHandler authenticationSuccessHandler; public SecurityConfig(CustomAuthenticationSuccessHandler authenticationSuccessHandler) { this.authenticationSuccessHandler = authenticationSuccessHandler; } @Bean public SecurityFilterChain securityFilterChain(HttpSecurity http) throws Exception { http .authorizeHttpRequests(authorize -> authorize .requestMatchers("/public/**").permitAll() .anyRequest().authenticated() ) .oauth2Login(oauth2 -> oauth2 .successHandler(authenticationSuccessHandler) .failureUrl("/login?error=true") ) .logout(logout -> logout .logoutSuccessUrl("/login?logout=true") .invalidateHttpSession(true) .deleteCookies("JSESSIONID") ); return http.build(); } } 8. 创建一个拦截器,用于在请求中恢复认证信息 package com.example.microservice.interceptor; import org.springframework.security.core.context.SecurityContextHolder; import org.springframework.security.oauth2.client.authentication.OAuth2AuthenticationToken; import org.springframework.security.oauth2.core.user.OAuth2User; import org.springframework.session.Session; import org.springframework.session.SessionRepository; import org.springframework.web.servlet.HandlerInterceptor; import org.springframework.web.servlet.ModelAndView; import javax.servlet.http.HttpServletRequest; import javax.servlet.http.HttpServletResponse; import javax.servlet.http.HttpSession; public class OAuth2AuthenticationInterceptor implements HandlerInterceptor { private final SessionRepository<? extends Session> sessionRepository; public OAuth2AuthenticationInterceptor(SessionRepository<? extends Session> sessionRepository) { this.sessionRepository = sessionRepository; } @Override public boolean preHandle(HttpServletRequest request, HttpServletResponse response, Object handler) { // 检查是否已经有认证信息 if (SecurityContextHolder.getContext().getAuthentication() == null) { HttpSession httpSession = request.getSession(false); if (httpSession != null) { String sessionId = httpSession.getId(); Session redisSession = sessionRepository.findById(sessionId); if (redisSession != null) { // 从Redis会话中恢复OAuth2认证信息 // 这里需要实现具体的逻辑,根据存储的信息重建OAuth2AuthenticationToken OAuth2User oauth2User = createOAuth2UserFromSession(redisSession); String registrationId = (String) redisSession.getAttribute("oauth2_provider"); if (oauth2User != null && registrationId != null) { OAuth2AuthenticationToken authentication = new OAuth2AuthenticationToken(oauth2User, oauth2User.getAuthorities(), registrationId); SecurityContextHolder.getContext().setAuthentication(authentication); } } } } return true; } private OAuth2User createOAuth2UserFromSession(Session session) { // 根据会话中存储的信息重建OAuth2User对象 // 这里需要实现具体逻辑 return null; // 实际实现中需要返回有效的OAuth2User } @Override public void postHandle(HttpServletRequest request, HttpServletResponse response, Object handler, ModelAndView modelAndView) { // 如果需要,可以在这里添加后处理逻辑 } @Override public void afterCompletion(HttpServletRequest request, HttpServletResponse response, Object handler, Exception ex) { // 如果需要,可以在这里添加完成后的逻辑 } } 9. 注册拦截器 package com.example.microservice.config; import com.example.microservice.interceptor.OAuth2AuthenticationInterceptor; import org.springframework.context.annotation.Configuration; import org.springframework.session.SessionRepository; import org.springframework.web.servlet.config.annotation.InterceptorRegistry; import org.springframework.web.servlet.config.annotation.WebMvcConfigurer; @Configuration public class WebConfig implements WebMvcConfigurer { private final SessionRepository<?> sessionRepository; public WebConfig(SessionRepository<?> sessionRepository) { this.sessionRepository = sessionRepository; } @Override public void addInterceptors(InterceptorRegistry registry) { registry.addInterceptor(new OAuth2AuthenticationInterceptor(sessionRepository)); } } 测试会话共享 创建一个控制器来测试会话共享功能: package com.example.microservice.controller; import org.springframework.security.core.annotation.AuthenticationPrincipal; import org.springframework.security.oauth2.core.user.OAuth2User; import org.springframework.web.bind.annotation.GetMapping; import org.springframework.web.bind.annotation.RestController; import javax.servlet.http.HttpSession; import java.util.HashMap; import java.util.Map; @RestController public class TestController { @GetMapping("/api/user-info") public Map<String, Object> getUserInfo(@AuthenticationPrincipal OAuth2User oauth2User, HttpSession session) { Map<String, Object> userInfo = new HashMap<>(); if (oauth2User != null) { userInfo.put("name", oauth2User.getAttribute("name")); userInfo.put("email", oauth2User.getAttribute("email")); userInfo.put("authorities", oauth2User.getAuthorities()); } userInfo.put("sessionId", session.getId()); userInfo.put("creationTime", session.getCreationTime()); userInfo.put("lastAccessedTime", session.getLastAccessedTime()); return userInfo; } @GetMapping("/api/session-test") public Map<String, Object> testSession(HttpSession session) { // 获取或设置会话属性 Object count = session.getAttribute("counter"); int newCount = 1; if (count != null) { newCount = (Integer) count + 1; } session.setAttribute("counter", newCount); Map<String, Object> result = new HashMap<>(); result.put("sessionId", session.getId()); result.put("counter", newCount); result.put("message", "此计数在所有微服务中共享"); return result; } } 部署架构 在实际微服务架构中,通常会通过API网关统一管理认证和会话。这里是一个简化的部署架构图: +----------------+ +----------------+ | API Gateway | | Auth Service | | (Zuul/Spring |---->| (OAuth2 Server)| | Cloud Gateway)| +----------------+ +-------+--------+ | v +-------+--------+ +-------+--------+ | Microservice A |<--->| Redis Session | +----------------+ | Storage | ^ +----------------+ | ^ v | +-------+--------+ | | Microservice B |-------------+ +----------------+ 安全注意事项 在实现会话共享时,需要注意以下安全事项: 确保Redis服务器安全配置,启用密码认证 使用SSL/TLS加密Redis连接 会话ID应使用足够长的随机字符串,防止被猜测 设置合理的会话超时时间 使用secure和httpOnly标志保护会话Cookie 考虑使用JWT等无状态认证方案作为补充 性能优化 为了提高系统性能,可以考虑以下优化措施: 配置Redis连接池 使用Redis集群提高可用性 合理设置会话数据的过期时间 仅存储必要的会话信息,避免存储大量数据 监控Redis性能指标,及时进行扩容 总结 通过Spring Security OAuth2与Spring Session Redis的整合,我们实现了微服务架构下的会话共享方案。这种方案具有以下优势: 统一的认证机制:通过OAuth2提供标准的认证流程 高效的会话存储:利用Redis高性能特性存储会话数据 透明的会话共享:微服务无需感知会话存储细节 良好的扩展性:可以方便地扩展到更多微服务 这种方案适用于大多数微服务架构,特别是那些需要保持用户状态的系统。通过合理配置和优化,可以构建一个安全、高效、可扩展的会话管理系统。