

ComfyUI 使用笔记
Reactor 换脸
ComfyUI-GIMM-VFI节点运行异常问题解决
节点用的是旧版本的torch的sdk,报这个错,作者还未修改
AttributeError: module 'torch.amp' has no attribute 'custom_fwd'
需要修改节点代码目录ComfyUI-GIMM-VFI\gimmvfi\generalizable_INR\modules\softsplat.py文件的第361行改成如下
@torch.cuda.amp.custom_fwd(cast_inputs=torch.float32)
和452行改成
@torch.cuda.amp.custom_bwd
安装CLIPSeg 报错
## install failed: With the current security level configuration, only custom nodes from the **"default channel"** can be installed.
解决方式:
更新ComfyUI-Manager插件即可
参考https://github.com/comfyanonymous/ComfyUI_TensorRT/issues/6
缺少EG_CYQ_JB节点
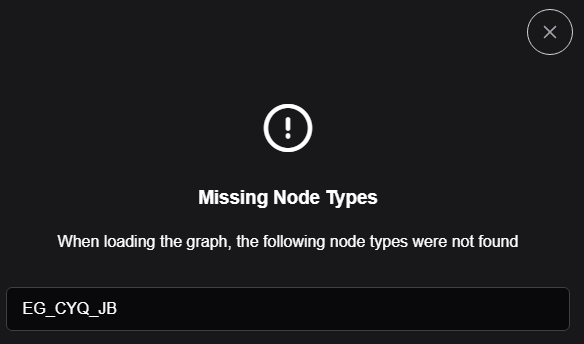
进入custom_nodes节点目录,执行
git clone https://github.com/11dogzi/Comfyui-ergouzi-DGNJD.git
手动拉去插件
参考https://openart.ai/workflows/tdlong189/flux-and-sd15-anime-to-real-photo/OMN6addlGc9qiSgaDsj5
命令行下载
huggingface-cli download black-forest-labs/FLUX.1-Depth-dev-lora --include "*.safetensors" --local-dir flux_comfyui --token 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
使用OmniGen报异常
RuntimeError: Failed to import OmniGen. Please check if the code was downloaded correctly.
解决:
A:\ComfyUI_windows_portable\python_embeded\python.exe" -m pip uninstall diffusers

A:\ComfyUI_windows_portable\python_embeded\python.exe" -m pip install diffusers==0.30.3

A:\ComfyUI_windows_portable\python_embeded\python.exe" -m pip install peft==0.13.2
 python.exe -m pip install timm  -i https://pypi.tuna.tsinghua.edu.cn/simple
安装
 error: command 'cl.exe' failed: None
      [end of output]

  note: This error originates from a subprocess, and is likely not a problem with pip.
  ERROR: Failed building wheel for insightface
解决方式:
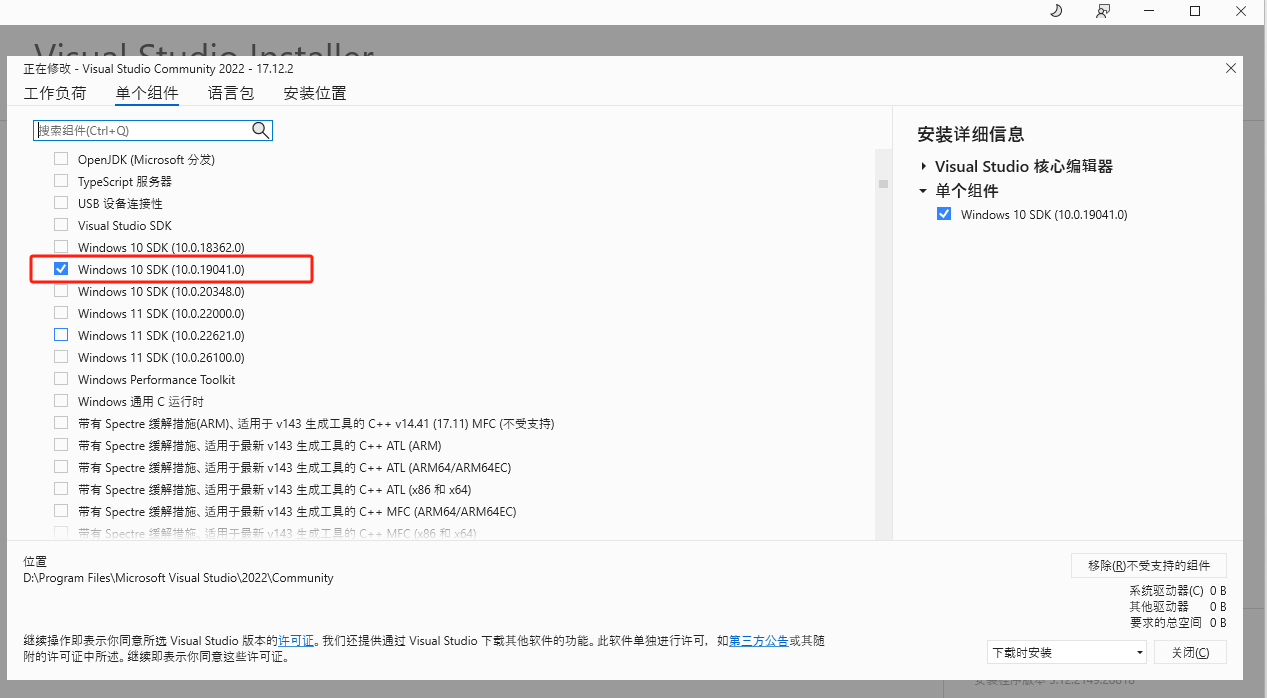
- 安装vs2022
- 配置环境
一、在哪里配置 配置的地方呢就是在 控制面板的用户账户里面的用户账户,话不多说,上图!
1).打开控制面板
2).找到用户账户
3).找到更改我的环境变量
4).最终路径

二、开始配置 1)、总体步骤 总体步骤是:首先path里面添加路径,然后新建include变量添加相关路径,接着新建bin变量添加相关路径,最后点击确定添加完成!
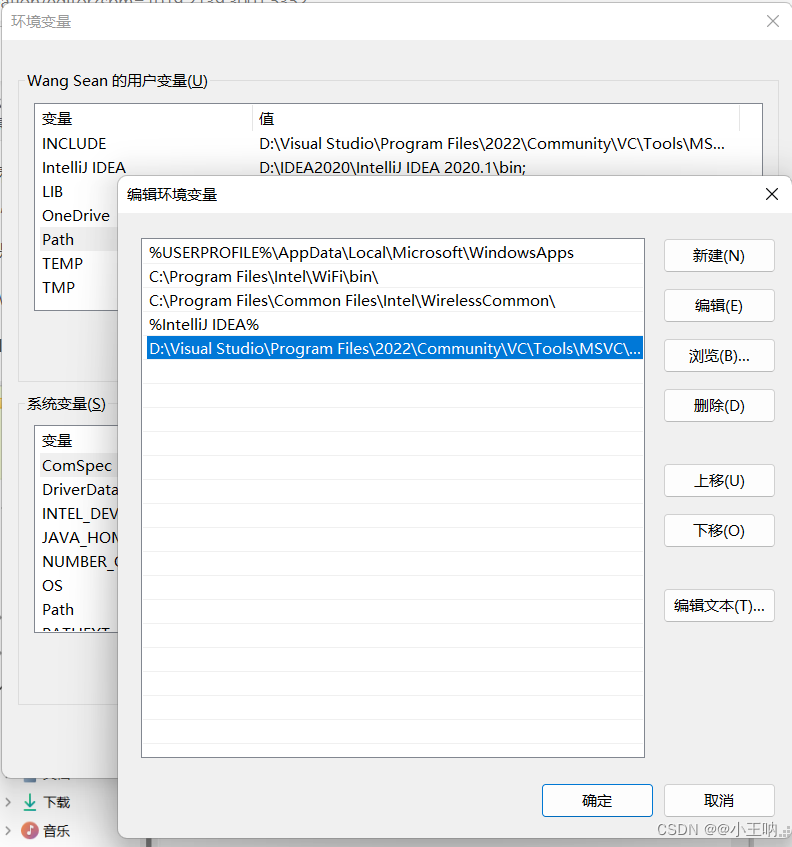
2)、配置步骤 1.Path变量的操作 先在 ***的用户变量 里面找到 Path;
    然后双击或者点击编辑;

    接着找到自己的Visual Studio的安装路径(桌面图标,右键,打开文件所在位置,然后找到主路径,如图)

    这是打开文件所在位置后定位到的路径:

    D:\Visual Studio\Program Files\2022\Community\Common7\IDE
在IDE文件夹里面,devenv.exe就是我们的IDE软件,
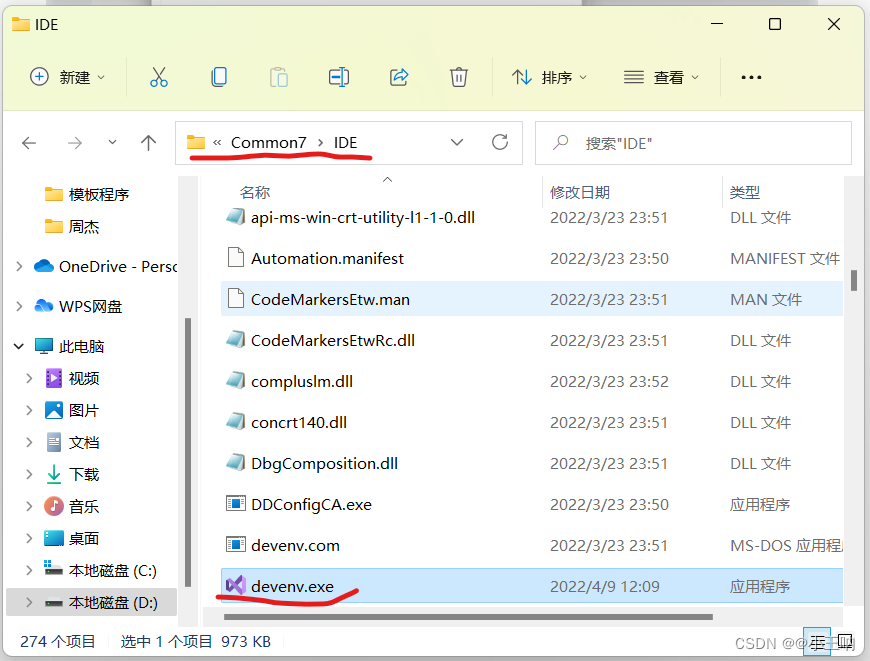
接下来下一步,找到主路径,往上走两个文件夹,定位到
D:\Visual Studio\Program Files\2022\Community
Community是我安装的Visuai Studio版本为社区版,如果是专业版就应该是Professional文件夹,
前面的 D:\Visual Studio\Program Files\2022只是我安装的路径,这就是为什么使用打开文件所在位置来定位文件路径,这样的话可以避免大家的安装位置不一样而导致这个教程不适用,一般来说无论安装在哪里,都会有一个Community或者Professional又或者Enterprise文件夹;
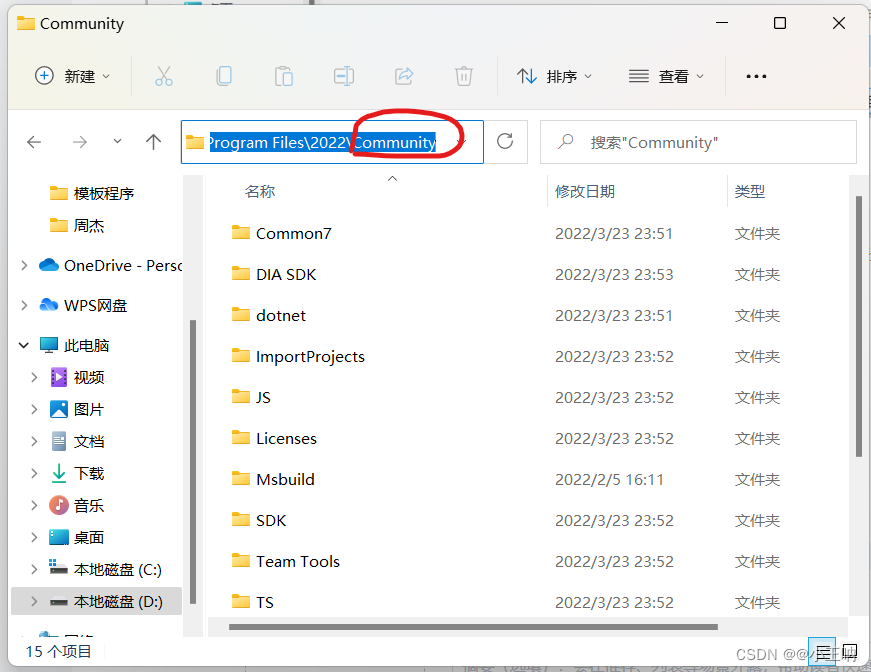
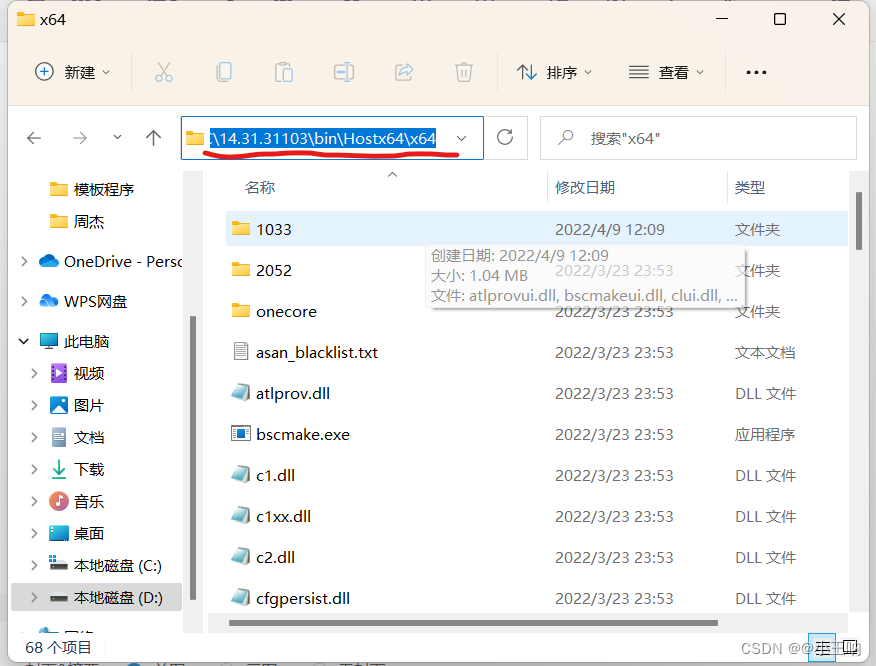
然后一次点击文件夹VC、Tools、MSVC、14.31.31103、bin、Hostx64、x64,定位到路径:
D:\Visual Studio\Program Files\2022\Community\VC\Tools\MSVC\14.31.31103\bin\Hostx64\x64
注意文件夹14.31.31103大家的可能会不一样,但是没关系,都是一串数字,然后将下图蓝色的文件路径复制到粘贴板;
最后回到环境变量双击Path的界面,点击新建,输入复制的文件路径,回车,确认即可,如图:
2.include变量操作 先寻找文件路径,还是刚才的D:\Visual Studio\Program Files\2022\Community路径,接下来
依次点击VC、Tools、MSVC、14.31.31103、include文件夹,定位到
D:\Visual Studio\Program Files\2022\Community\VC\Tools\MSVC\14.31.31103\include 这个路径,注意14.31.31103还是会不一样,但是仍旧是一串数字的那个文件夹,
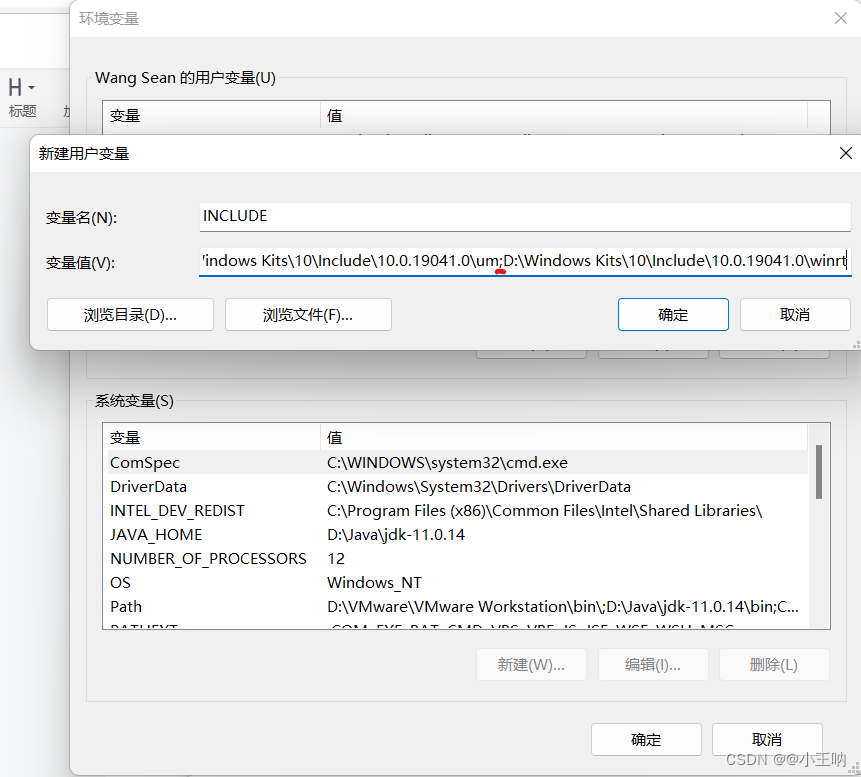
然后在用户变量里面新建环境变量,把上面的路径输入,在后面加上冒号;(英文输入法,下同)
D:\Visual Studio\Program Files\2022\Community\VC\Tools\MSVC\14.31.31103\include
然后定位到 Windows Kits 文件夹,如果你把应用装在D盘,你就会在D盘找到D:\Windows Kits路径,而如果你的应用在C盘那就再路径C:\Program Files (x86)会有一个Windows Kits文件夹,这里以路径D:\Windows Kits为例,找到路径D:\Windows Kits\10\Include\10.0.19041.0,将文件夹10.0.19041.0里面的cppwinr和shared和ucrt和um和winrt五个文件夹的路径依次添加到刚刚新建的INCLUDE环境变量下,
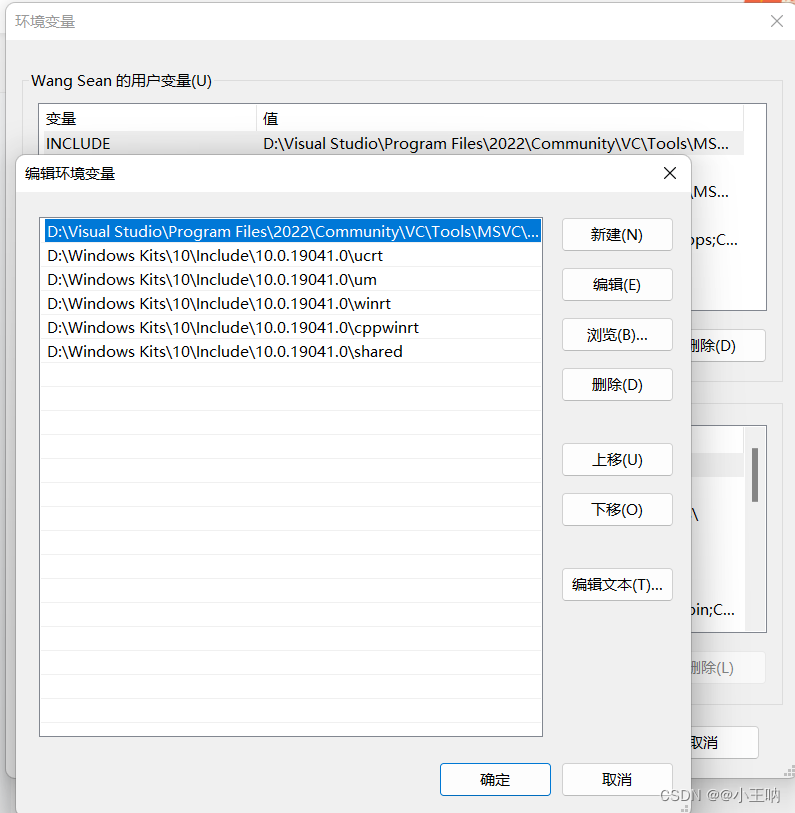
D:\Windows Kits\10\Include\10.0.19041.0\cppwinr
D:\Windows Kits\10\Include\10.0.19041.0\shared
D:\Windows Kits\10\Include\10.0.19041.0\ucrt
D:\Windows Kits\10\Include\10.0.19041.0\um
D:\Windows Kits\10\Include\10.0.19041.0\winrt
所有的路径如下,总共是6个 (注意路径之间的分号)如下图:
点击确定后双击INCLUDE查看如下图:
点击确定就完成了include的环境变量配置;
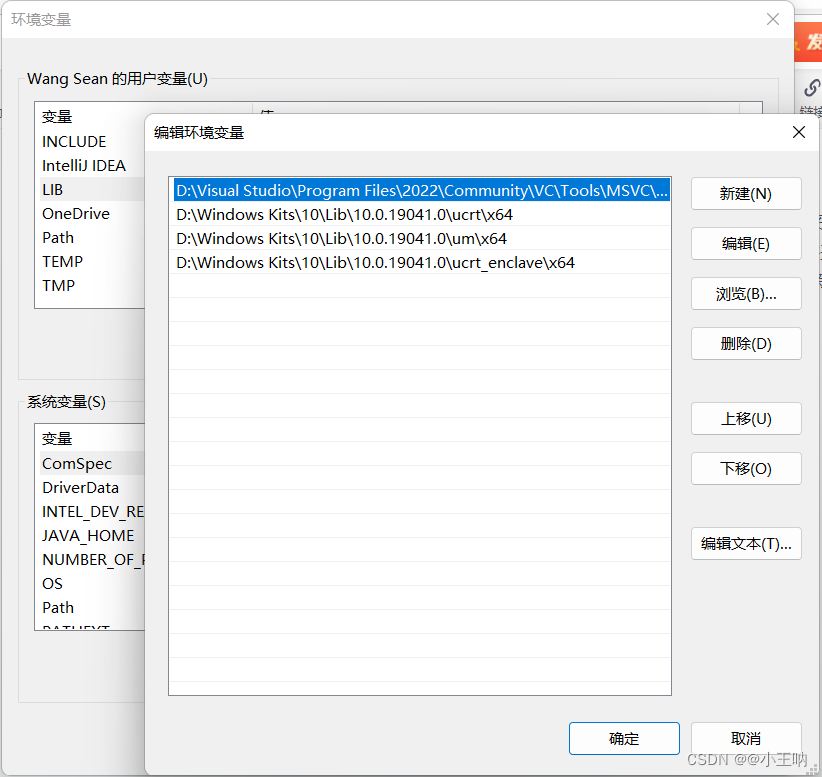
3.lib环境变量配置
同样,再建一个LIB环境变量,还是先寻找文件路径,而且还是刚才的D:\Visual Studio\Program Files\2022\Community路径,接下来
依次点击VC、Tools、MSVC、14.31.31103、lib文件夹,定位到D:\Visual Studio\Program Files\2022\Community\VC\Tools\MSVC\14.31.31103\lib\x64路径,注意14.31.31103还是会不一样,但是仍旧是一串数字的那个文件夹,然后在用户变量里面新建环境变量,把上面的路径输入,在后面加上冒号(英文输入法下的冒号 ; )
然后定位到 Windows Kits 文件夹,如果你把应用装在D盘,你就会在D盘找到D:\Windows Kits路径,而如果你的应用在C盘那就再路径C:\Program Files (x86)会有一个Windows Kits文件夹,这里以路径D:\Windows Kits为例,找到路径D:\Windows Kits\10\Include\10.0.19041.0,将文件夹10.0.19041.0里面的ucrt和ucrt_enclave和um三个文件夹下面的x64文件夹路径依次添加到新建的LIB环境变量里面,
D:\Windows Kits\10\Lib\10.0.19041.0\ucrt\x64
D:\Windows Kits\10\Lib\10.0.19041.0\ucrt_enclave\x64
D:\Windows Kits\10\Lib\10.0.19041.0\um\x64
注意路径间的分号,然后点击确定,查看如下图:
到此为止,建立完毕,点击确定完成环境变量的配置!
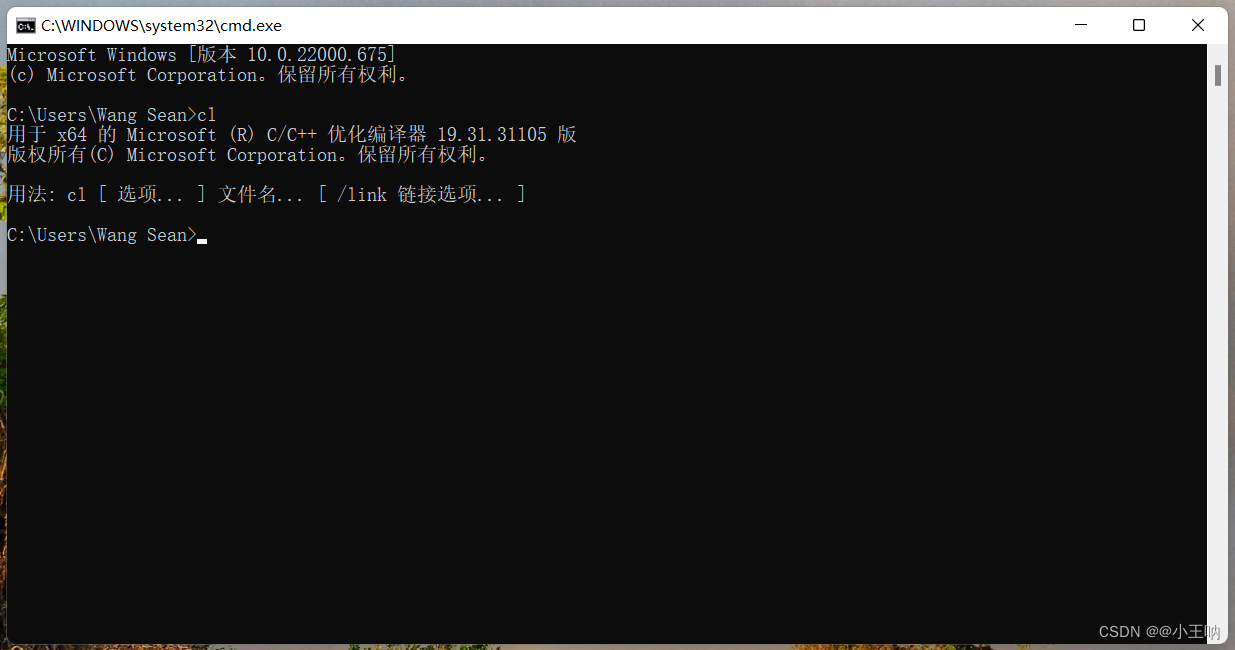
win+r输入cmd打开命令提示符窗口,输入cl,出现下图则配置成功,
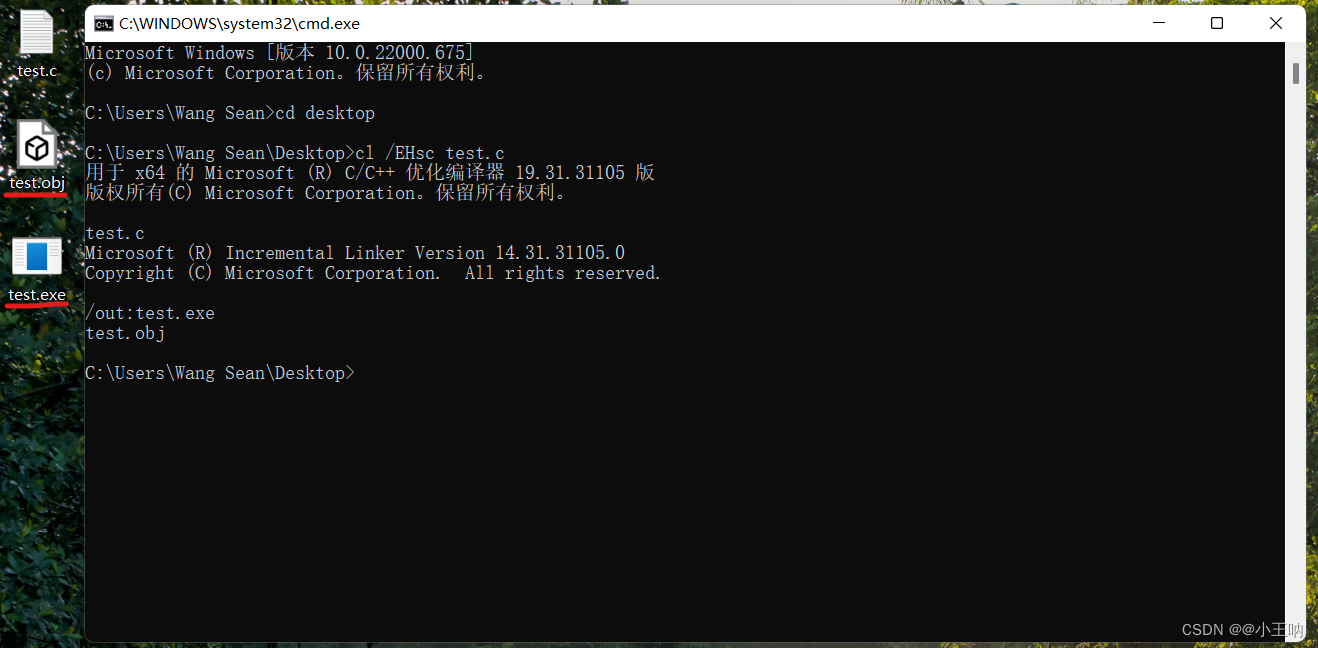
三、测试 在桌面右键创建一个txt文本文件,修改名称为test.c(.c是后缀),就得到一个C格式文件,双击打开,写入代码:
#include <stdio.h> #include <stdlib.h> int main() { printf("hello world!"); return 0; } 保存

win+r输入cmd打开命令提示符窗口,输入cd desktop定位到test.c所在的桌面路径,
输入cl /EHsc test.c,回车,会生成.obj文件和.exe可执行文件:
接着输入test就会生成打印 hello world!
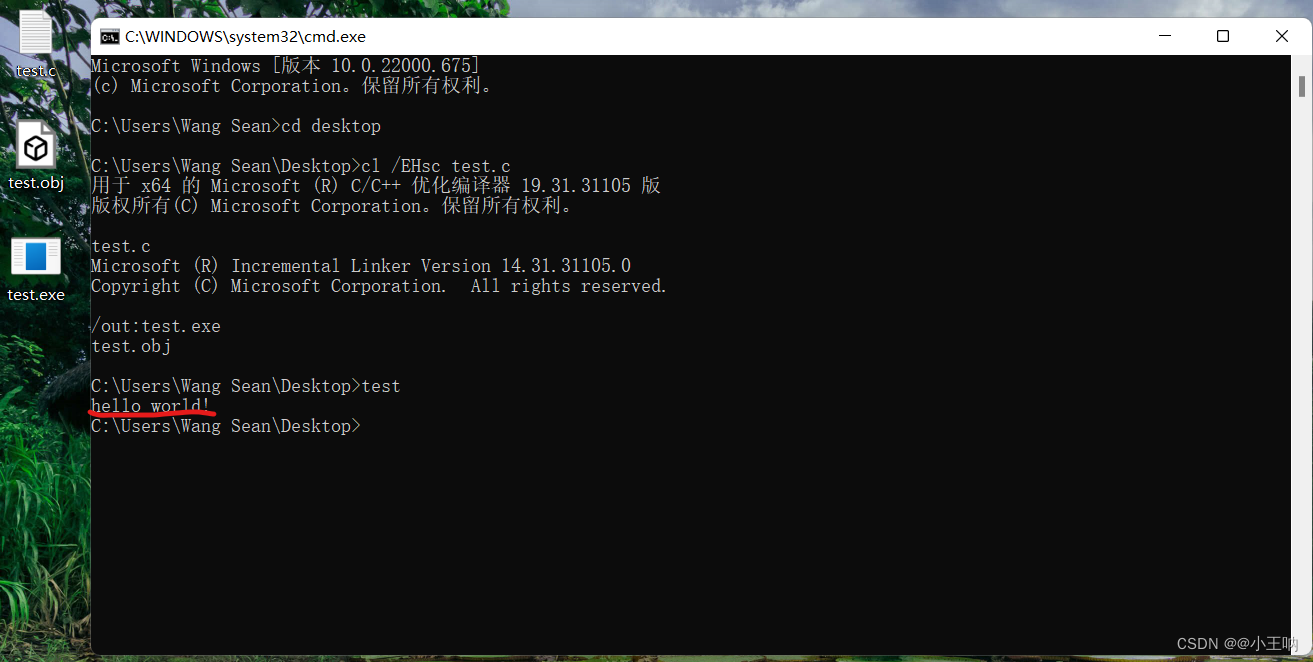
测试完毕!
参考https://blog.csdn.net/2301_79301617/article/details/134175538
参考https://blog.csdn.net/en_Wency/article/details/124767742
视频嘴型同步
- 视频帧率有要求
- 语音频率有要求
原生版本节点依赖安装
python.exe -m pip install f5_tts -i https://pypi.tuna.tsinghua.edu.cn/simple
模型国内源配置
这里我会针对ComfyUI讲一种简单的方法,修改python库huggingface_hub。以下是具体操作步骤:
在 python_embeded\Lib\site-packages\huggingface_hub 目录下,找到__init__.py文件,右键点击编辑打开它,在最后一行加上
os.environ['HF_ENDPOINT'] = 'https://hf-mirror.com'
然后保存文件即可!
评论